
Make Your Own Potting Soil Mix – Save Money, Boost Your Plants!


Make the Best Seed Starting Mix for Dirt Cheap (It’s Organic Too)
The best DIY seed starting mix needs only three ingredients, and you can find them all in your local garden center. Save money and get my no-fail recipes for organic seed starting mix and potting mix that you can easily make at home (all without complicated soil amendments and fertilizers). Keep them dry and you can store them to use next season too.
Read in Full at Link Below
https://www.gardenbetty.com/how-to-make-your-own-seed-starting-and-potting-mix/


How to treat respiratory tract infections with everyday foods and spices ~

How to treat respiratory tract infections with everyday foods and spices
Here are eight foods and spices to help keep you free of respiratory tract infections during these cold, winter months:
1) Echinacea. This flowering herb has been a staple in natural medicine for hundreds of years, as it possesses unique, immune-boosting compounds that work almost immediately at the first sign of infection to quell it quickly. Commonly referred to throughout history as a “cure-all” herb, echinacea helps naturally boost the body’s own natural levels of properdin, a chemical substance that activates the part of the immune system responsible for warding off bacteria and viruses. Echinacea can also help reduce the severity of existing cold and flu symptoms, and help quickly eliminate such conditions (http://www.umm.edu/altmed/articles/echinacea-000239.htm).
2) Garlic. A powerful immune booster, garlic has also been used for many centuries as a natural remedy for respiratory illness. Long before synthetic antibiotics were invented, in fact, garlic was the medicine of choice for treating infections, as it contains powerful medicinal compounds such as allicin, sulfhydryl and various other sulfur-containing compounds that ward off disease. Adding more fresh garlic to your diet or taking garlic supplements is a great way to fortify your immune system to avoid disease (http://www.umm.edu/altmed/articles/garlic-000245.htm).
For a great healing tea recipe using garlic, check out The Nourishing Gourmet‘s “Garlic, Honey, and Lemon Tea:”
http://www.thenourishinggourmet.com
3) Green onion (scallion). A close relative of garlic, the green onion also possesses powerful immune-boosting compounds that make it an excellent remedy and preventive food for respiratory tract infections. Rich in organic sulfur compounds, as well as vitamin C, B vitamins, and trace minerals, green onions are a food you will definitely want to eat plenty of during the winter months. Try making a vegetable soup out of green onions, leeks, and garlic for immune support, and add any other ingredients you like into the mix (http://www.pyroenergen.com/articles09/green-onions-scallion.htm).
4) Ginger. Packed with more than a dozen antiviral compounds, ginger is an excellent herb for both preventing and treating colds and flu. Ginger is especially helpful if you already have a respiratory ailment that you are trying to get rid of, as the herb works exceptionally well at relieving pain and disinfecting the body. Ginger can be taken as tea, brewed into a tincture, or chopped or grated and added to food (http://www.umm.edu/altmed/articles/ginger-000246.htm).
5) Elderberry. No immune-boosting arsenal would be complete without elderberry, an herb that ranks among the most effective remedies for treating respiratory illness. Rich in antioxidant flavonoids, elderberry is uniquely suited to both prevent and treat illness due to its unique ability to minimize the swelling of mucous membranes. The fruit is also a powerful anti-inflammatory, antiviral, and anticancer food (http://www.umm.edu/altmed/articles/elderberry-002880.htm).
The Wellness Mama blog has a great recipe for making your own elderberry syrup medicine at home:
http://wellnessmama.com
6) Oregano. A potent antibiotic and antiviral herb, oregano, and particularly oil of oregano, is another amazing remedy that works particularly well at treating respiratory illness after it has already formed. You can mix five or six drops of oil of oregano in water and gargle with it for instant relief, or you can drink the entire thing down to kill a flu or cold in as little as 24 hours. Oil of oregano can also be purchased as a supplement in capsule or gelcap form (http://www.earthclinic.com/Supplements/oregano-oil.html).
7) Vitamin C. Though it is sometimes mocked by the mainstream medical system as an inert substance, vitamin C has long been confirmed as a powerful nutrient for boosting immunity and warding off disease. A 2004 study review out of Finland, for instance, found that respiratory patients who take vitamin C are far less likely to develop colds, pneumonia, and other respiratory infections (http://www.ncbi.nlm.nih.gov/pubmed/15605943). Just be sure to take non-GMO ascorbic acid, sodium ascorbate, or natural vitamin C as it comes from “superfoods” like acerola cherry and camu camu berry (http://lpi.oregonstate.edu/infocenter/vitamins/vitaminC/).
8) Vitamin D. Millions of Americans have dangerously low levels of vitamin D in their system, which is a primary cause of chronic illness today, including respiratory illness. This is why it is important, especially during the winter months, to either supplement daily with between 2,000 and 10,000 international units (IU) of vitamin D3 — some doctors recommend that severely deficient patients take upwards of 40,000 IU of vitamin D3 daily — or use a tanning bed or tanning wall daily.
You can learn more about the importance of vitamin D for health by visiting the Vitamin D Council:
http://www.vitamindcouncil.org/
Sources for this article include:
http://www.organicnutrition.co.uk/articles/colds.htm
http://www.thenourishinggourmet.com
http://www.motherearthliving.com
Learn more: http://www.naturalnews.com/038688_respiratory_tract_infections_spices.html#ixzz3H7MfukuM
~~~~~~~~~~~~
Natural amino acids preferable to antibiotics for treating infections, says study
Learn more:http://www.naturalnews.com/032825_amino_acids_antibiotics.html#ixzz3H1TzOCth

Turmeric and Neti Pots Help Sinus Infections and Chronic Sinusitis
Learn more:http://www.naturalnews.com/029600_neti_pot_sinus_infections.html#ixzz3H1U261Bh

Olive leaf extract prevents cancer and fights infections
Learn more: http://www.naturalnews.com/042638_olive_leaf_extract_prevent_cancer_infections.html#ixzz3H1TrfeUn

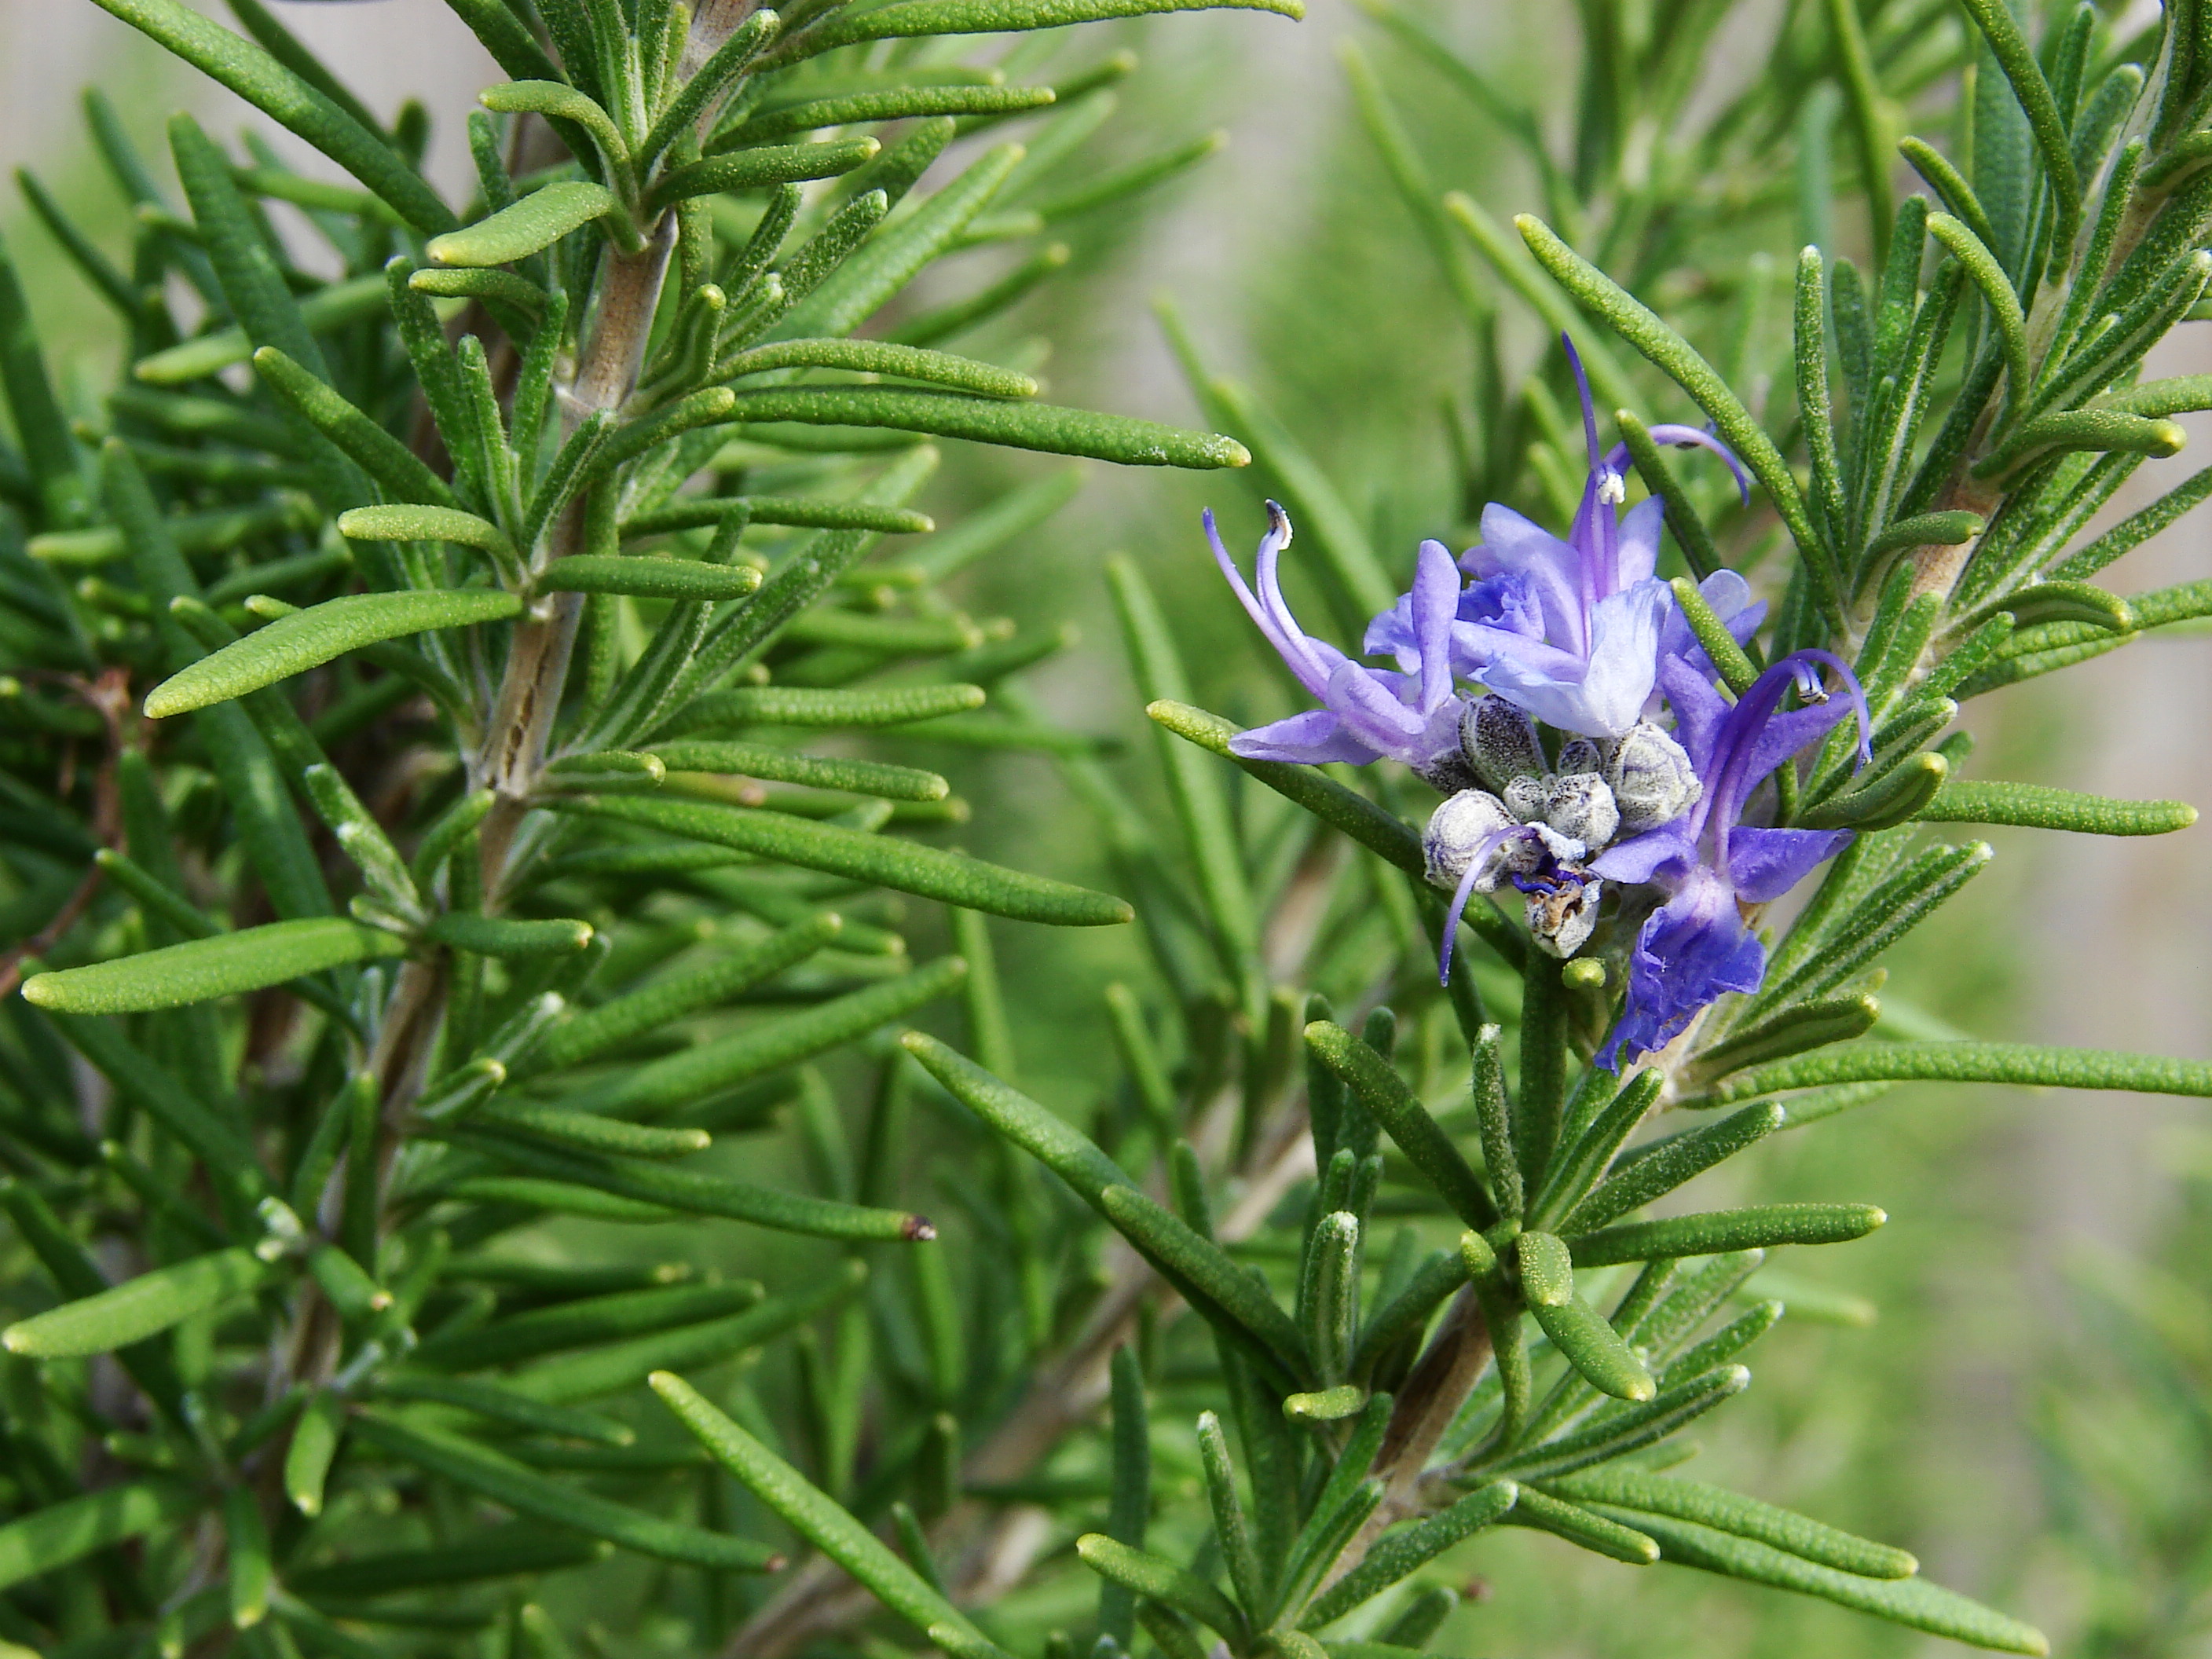
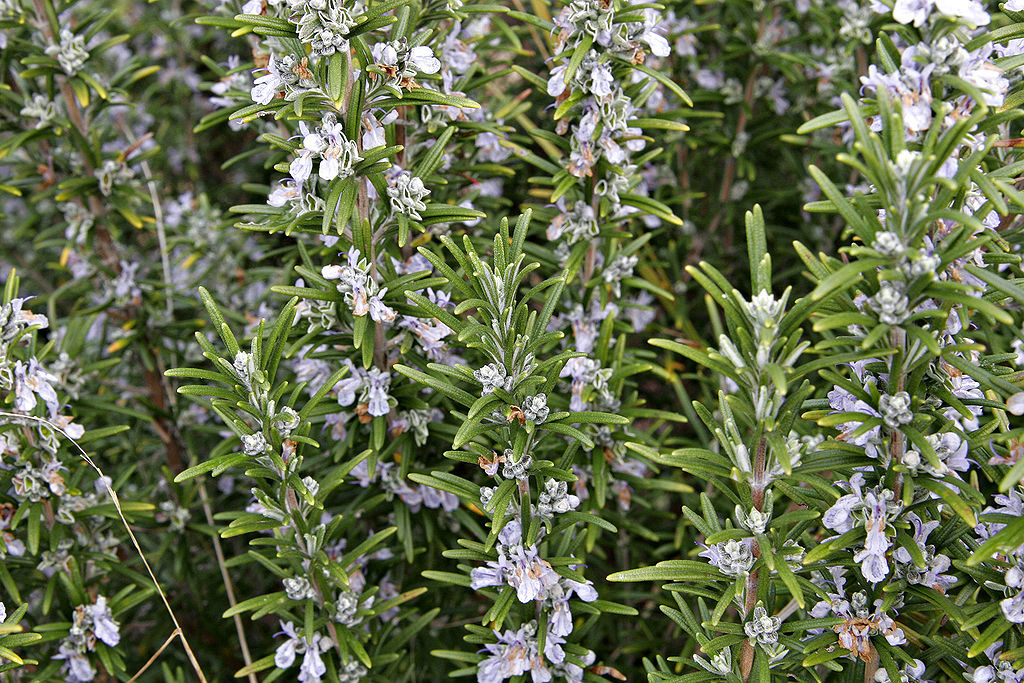
Rosemary Health Benefits and Uses ~ Plant Care Guide

(NaturalNews) Rosemary’s delightful fragrance combined with its pungent taste has convinced many avid cooks to use it in various dishes, including soups and sauces. It is historically known to improve memory by increasing blood flow to the brain and head, which by extension also helps improve concentration. Rosemary also has the ability to improve digestion and seemingly reduce the severity of asthma attacks. In ancient Greece, it had such a formidable reputation to improve memory that students would often put rosemary sprigs in their hair when studying for exams.
Rosemary basically grows on small evergreen shrubs which are part of the Labiatae family, also related to mint. It may come from the Mediterranean but it’s now widely developed in Europe and America’s milder climates.
There are many health benefits associated to this wonderful herb which has been studied by various researchers around the world. Based on some of the accumulated results, rosemary displayed a few other noteworthy qualities besides the ones already mentioned above.
Two of its components, caffeic acid and rosemarinic acid, are potent antioxidant and anti-inflammatory substances that help diminish inflammation, an important factor in asthma, liver disease or heart disease.
The Cancer Research Institute of Slovakia has come to the conclusion that rosemary helps protect DNA from free radical deteriorations, hence a possible aid in the fight against cancer.
Italian researchers noticed that rosemary has a protective effect on protein HSP70. Since protein HSP70 plays an active role in preventing any harm done to the skin, scientists believe that rosemary may be a contributing factor in reducing age-related damages such as wrinkles.
French scientists from the National Institute of Agronomic Research are on record saying that rosemary assists detoxifying enzymes, such as cytochrome P450, glutathione transferase and quinone reductase, in getting rid of toxins found inside the liver.
So what has research shown about rosemary’s effects on the brain?
United Kingdom researchers from Northumbria University discovered that when an amount of 1.8-cineole, a prime chemical found in rosemary oil, makes its way into the bloodstream, the end result leads to improved brain performance.
During the experiment, scientists exposed 20 individuals to various levels of the oil’s aroma and then collected blood samples to confirm how much of the 1.8-cineole each member actually took in. The individuals were then asked to take speed, accuracy and mood tests in order to confirm if rosemary oil showed any positive effects.
It turns out that the more the 1.8-cineole was found in a person’s blood, accuracy and speed performances were also increased. Only mild effects were noticeable in regards to changes in moods.
Dr. Mark Moss was quoted saying that the aroma acts like a medicinal drug. These tests have definitely opened the eyes of many about rosemary’s potential effects on the brain, although some say the results should only be considered for now as preliminary ones.
Sources for this article include:
http://letsgohealthy.blogspot.ca
http://www.whfoods.com/genpage.php?tname=foodspice&dbid=75
About the author:
After spending several years working in property management and being a web consultant for PS Communications, P. Simard is now focusing on being a naturopath in Quebec.
Learn more: http://www.naturalnews.com/041110_rosemary_brain_performace_anti-inflammatory_herbs.html#ixzz3FDkrijfB

Use rosemary leaves for glossy hair and good circulation
http://www.naturalnews.com/032781_rosemary_hair.html
Rosemary oil can be used as a natural meat preservative, and it works better than chemical additives
http://www.naturalnews.com/034573_rosemary_preservative_food.html
Rosemary Plant Care Guide

Nine reasons to eat more sweet potatoes

The sweet potato (Ipomoea batatas) is a dicotyledonous plant that belongs to the family Convolvulaceae. Its large, starchy, sweet-tasting, tuberous roots are a root vegetable. The young leaves and shoots are sometimes eaten as greens. Ipomoea batatas is native to the tropical regions in America. Of the approximately 50 genera and more than 1,000 species of Convolvulaceae, I. batatas is the only crop plant of major importance—some others are used locally, but many are poisonous. The sweet potato is only distantly related to the potato (Solanum tuberosum) and does not belong to the nightshade family.
The genus Ipomoea that contains the sweet potato also includes several garden flowers called morning glories, though that term is not usually extended to Ipomoea batatas. Some cultivars of Ipomoea batatas are grown as ornamental plants; the name “tuberous morning glory” may be used in a horticultural context.
The plant is a herbaceous perennial vine, bearing alternate heart-shaped or palmately lobed leaves and medium-sized sympetalous flowers. The edible tuberous root is long and tapered, with a smooth skin whose color ranges between yellow, orange, red, brown, purple, and beige. Its flesh ranges from beige through white, red, pink, violet, yellow, orange, and purple. Sweet potato varieties with white or pale yellow flesh are less sweet and moist than those with red, pink or orange flesh.
In certain parts of the world, sweet potatoes are locally known by other names. In New Zealand English, the Māori term kūmara (also spelled kūmera) is commonly used. Although the soft, orange sweet potato is often called a “yam” in parts of North America, the sweet potato is botanically very distinct from a genuine yam (Dioscorea), which is native to Africa and Asia and belongs to the monocot family Dioscoreaceae. To add to the confusion, a different crop plant, the oca, Oxalis tuberosa (a species of woodbind), is called a “yam” in many parts of Polynesia, including New Zealand. To prevent confusion, the United States Department of Agriculture requires sweet potatoes labeled as “yams” to also be labeled as “sweet potatoes”. The sweet potato is North Carolina’s state vegetable.
http://en.wikipedia.org/wiki/Sweet_potato

(NaturalNews) Sweet potatoes are packed with nutrition. They are a great source of minerals such as manganese, folate, copper, and iron. The darker-colored variety is a great source of carotenes (precursor of vitamin A), vitamins C, B2, B6, E and biotin. Sweet potatoes are also a fantastic source of dietary fiber. Here are nine reasons you should be eating more sweet potatoes:
Nine Reasons Why You Should Eat Sweet Potatoes
1. Sweet potatoes are high in antioxidants, which work in the body to prevent inflammatory problems like asthma, arthritis, gout, and many more.
2. Sweet potatoes are an excellent source of carbohydrates for those with blood sugar problems. These fibrous root vegetables can help regulate blood sugar levels and prevent conditions like insulin resistance.
3. Sweet potatoes are healthy for the digestive tract. Being rich in digestive fiber, especially when the skin is also consumed, it helps to relieve constipation and may prevent colon cancer.
4. Sweet potatoes are good for those who are pregnant or trying to conceive because they are high in folate, which is essential for the healthy development of fetal cell and tissue.
5. Packed with important vitamins and other nutrients, eating sweet potatoes can boost immunity by supporting the needs of the body.
6. Sweet potatoes are good for preventing heart disease. High in potassium, sweet potatoes can help prevent the onset of heart attack and stroke. Potassium also helps to maintain fluid and electrolyte balance in the body, which is important for stabilizing blood pressure and regulating heart function.
7. Sweet potatoes are good for alleviating muscle cramps. Potassium deficiencies are a leading cause of muscle cramps, as well injuries. By making sweet potatoes a regular part of your diet (along with proper exercise), you can expect an energy boost and fewer muscle cramps and injuries.
8. Sweet potatoes are good for treating stress-related symptoms. The body tends to use a lot of potassium and other important minerals when it is under stress. Sweet potatoes provide important minerals that will help maintain balance throughout the body during times of stress.
9. Sweet potatoes ranked number one in nutrition out of all vegetables by the Center for Science in the Public Interest because they are such a rich source of dietary fiber, natural sugars, complex carbohydrates, protein, carotenoids, vitamin C, iron and calcium.
Further Reading:
http://www.whfoods.com/genpage.php?tname=foo…
http://www.organicfacts.net/health-benefits/…
http://www.ayushveda.com/womens-magazine/hea…
Learn more: http://www.naturalnews.com/031543_sweet_potatoes_minerals.html#ixzz3CgEZGv5T

Eggplant Pickles (Stuffed Eggplant Pickles) Recipe ~ How to Plant Eggplant

Makdous (Pickled Stuffed Eggplant in Olive Oil)

How to Plant & Germinate Eggplant : Garden Seed Starting

Eggplants in containers
Genetically-modified eggplant found to be unsafe for human consumption, Environment
Natural antibiotics to stockpile now: 10 herbs and foods that kill superbugs

(NaturalNews) Longtime readers of Natural News know that, because of massive over-prescribing by the modern healthcare industry, today’s crop of antibiotics are becoming less and less effective. Another culprit: The increased use of antibiotics in factory-farm animals.
“It is not difficult to make microbes resistant to penicillin in the laboratory by exposing them to concentrations not sufficient to kill them,” warned Alexander Fleming, the creator of the first antibiotic, penicillin, back in 1945 when he received his Nobel Prize for medicine. “There is the danger that the ignorant man may easily underdose himself and by exposing his microbes to non-lethal quantities of the drug make them resistant.”
And while bacteria have been a part of “life” on Earth for humans since the dawn of time, constant exposure to antibiotics — which kill even “good” bacteria — is responsible for the rise of superbugs that are resistant to an increasing number antibiotic drugs.
With that in mind, and before you find yourself in dire need of something that will kill the superbugs, here are 10 herbs and foods that will do the job naturally:
— Honey: In a recently released study, researchers from the Salve Regina University in Newport, Rode Island, reaffirmed that raw honey is one of the best natural antibiotics you can have.
Lead author Susan M. Meschwitz, Ph.D., presented the findings at the 247th National Meeting of the American Chemical Society.
“The unique property of honey lies in its ability to fight infection on multiple levels, making it more difficult for bacteria to develop resistance,” she said.
Honey uses a combination of weapons including polyphenols, hydrogen peroxide and an osmotic effect. Honey is practically an ambidextrous fighter, using multiple modalities to kill bacteria.
— Colloidal silver: As noted by Gregory A. Gore, in his book, Defeat Cancer:
Silver was used 1,200 years ago by Egyptians, Romans, Greeks, sailors, and then by the pioneers who populated our country. They used it for various illnesses and to keep their foods and liquids from spoiling. Prior to 1938, before antibiotics, colloidal silver was used by doctors as their main substance to fight bacteria in a more natural way than through the antibiotics they use today. Antibiotics can harm our kidneys and liver functions. Colloidal silver promotes healing.
— Pascalite: This is a type of bentonite clay found only in the mountains of Wyoming. It possesses remarkable healing powers. When it is used topically, it is known for its ability to draw infections from wounds in a matter of hours or days, thereby bringing about total recovery. The first recorded use of Pascalite was in the early 1930s when a trapper named Emile Pascal set his traps near a cold, clear mountain lake, where he had noticed a large number of animal tracks; after getting some of it on his chapped hands, he noticed some time later that it appeared to help them. So he continued to experiment with the substance and found that it had a number of topical uses, including for burns, minor wounds and infections.
— Turmeric: This herb has been used in Ayurvedic and Chinese medicine for many thousands of years to treat a wide range of infections. The antibacterial and anti-inflammatory qualities have been known to be highly effective in the treatment of bacterial infections. It can also be used topically for MRSA and additional lesions of the skin.
— Oil of Oregano: This is an essential oil known best for its bacteria-killing abilities, as well as controlling staph infections like MRSA. It contains antioxidant, antiseptic, antiviral, antifungal, anti-inflammatory, antiparasitic and pain-relieving properties. In 2001, Science Daily reported on a Georgetown University study which found that oregano oil’s germ-killing properties were nearly as effective as most antibiotics.
— Tea tree oil: This is also a very potent and essential oil that has been shown to be effective in killing antibiotic-resistant MRSA on the skin. One important note: Therapeutic-grade tea tree oil must be used undiluted if it is to be used for this purpose.
— Olive leaf extract: This substance has been used for a number of centuries to battle bacterial infections and is now currently being used as well to fight MRSA infections in some European hospitals. It provides immune system support while fighting antibiotic-resistant infections.
— Garlic: This tasteful seasoning veggie has been used for medicinal purposes around the world for thousands of years. It was even used in the 1700s to ward off the plague. It possesses very potent antibiotic, antiviral and antifungal properties.
— Echinacea: This compound has been used to treat aging and a wide variety of infections for centuries. It was traditionally used to treat open wounds, as well as blood poisoning, diphtheria and other bacteria-related illnesses. Today, it is used mostly to treat colds and flu.
— Goldenseal: This is one of the most popular herbs sold on the American market and has recently gained a reputation as an herbal antibiotic and immune system enhancer. American Indians used goldenseal as a medication for inflammatory internal conditions such as respiratory, digestive and genitourinary tract inflammation induced by allergy or infection, according to Herbwisdom.com.
Sources:
http://science.naturalnews.com
Learn more: http://www.naturalnews.com/045584_natural_antibiotics_superbugs_herbal_medicine.html#ixzz3AQ5vwjOT

Xerochrysum bracteatum ~ Strawflower , Everlasting ~ Health Benefits and Uses

The health benefits of Helichrysum Essential Oil can be attributed to its properties as an antispasmodic, anticoagulant, antiallergenic, antimicrobial, antihaematoma, antiphlogistic, nervine, antiinflammatory, antitussive, cicatrisant, expectorant, febrifuge, anti septic, cholagogue, emollient, mucolytic, fungicidal, hepatic, diuretic, splenic and cytophylactic substance.
Helichrysum, the flower that contributes to “Everlasting” and “Immortal” Essential Oil, and known by the names Helichrysum Angustifolium and Helichrysum Italicum, is an European herb native to France, Italy and a few neighboring countries.

MEDICINAL APPROACH & PROPERTIES
The essential oil shows considerable infraspecific variation; its main components are monoterpene hydrocarbons (pinene, camphene, myrcene, and limonene) and monoterpene-derived alcohols (linalool, teripinene-4-ol, nerol, geraniol, also their acetates);
Further important aroma components are nonterpeoid acylic beta-ketones. It sounds so technical that it’s confusing but they are important elements and they need to be mentioned.
So many people are beginning to appreciate the healing elements of this plant and aroma therapists world wide recognize the power of this plant, heres a link to a super piece all about our friend Helichrysum Italicum, so get reading folks.
Scroll dow now below and discover what helichrysum can do for you if you have a skin issue but not only : In fact it is also thought to be a strong chelator, supporting liver function and potentially drawing heavy metals and toxins out of the body. It is noted as one of, if not THE, most effective detoxification supporting essential oils by Battaglia in ‘The Complete Guide to Aromatherapy’. A strong dilution can be used (coconut oil, for example) and massaged twice per day into the feet. The reflex points of the feet corresponding to the liver may be of greatest help in this process.
Helichrysum essential oil therapeutic properties: READ IN FULL HERE ~
http://www.helichrysum-italicum.com/properties.html

Helichrysum bracteatum, Strawflower; Everlasting
An intense rich aroma with a herbaceous note. Among its properties are anti-inflammatory, antimicrobial, antitussive, astringent, diuretic, expectorant, fungicidal and cicatrisant.
The French used this oil primarily as an anti-inflammatory to regulate cholesterol, stimulate the cells of the liver, and as an antispasmodic. This particular variety has powerful antibruise properties. It’s ideal to use in lymphatic drainage massage, acts as a stimulant for the liver, gall bladder, kidneys and spleen and the organs responsible for detoxifying the body.
Italidone, one of its chemical components, has been found to have strong mucous thinning, expectorant and cicatrisant properties. It is a rejuvenating oil which promotes cell growth, helping to rebuild tissues. Clears the body of candida apparently, which often thrives when vitality is low. Blend with rosehip seed oil for scar formula or with lemon and geranium for kick-smoking blend. Assists in healing scars, acne, dermatitis, boils and abscesses.
http://medicalfunnyhoney.com/helichrysum

Plant Profile: The Strawflower
Scientific name: xerochrysum bracteatum (previously helichrysum bracteatum)
Other names: Everlasting, Paper Daisy, Golden Everlasting
The Strawflower, a flowering plant native to Australia, produces showy flowers with large dark green leaves. Plants can grow to be 3-4 feet tall, depending on the variety. The flower is also known as “paper daisy” for its papery texture. Just like the daisy, the center is made up of a cluster of tiny individual flowers. The “petals” surrounding the cluster are actually bracts. The plant will flower from summer to fall. The daisy-like flowers come in a wide range of colours, including white, yellow, pink and red.
Strawflowers are great additions to the garden, adding colour and texture to the landscape and will attract butterflies. Plant them in masses for the best effect. The taller varieties would be ideal as borders in a garden bed or rock garden. Gardeners love them because they are easy to grow, will tolerate heat and drought and can adapt to any soil condition. They can be grown as annuals, perennials, or shrubs. They also do well in containers.
Strawflowers don’t need much maintenance, but the plant would benefit from regular light pruning to encourage branching and increased blooms.
Strawflowers, especially the sturdier and long-stem varieties, are commonly used in the cut flower industry. Cut flowers can last between 2-3 weeks! Not only do they make great cut flowers, they are often used in dried floral arrangements because they are everlasting. When cut young and dried, the flowers and stems will retain their colour for a long time.
[growerdirect.com/plant-profile-the-strawflower]


5 things to know about the TOMATO
July 12, 2014

1. Cooked tomatoes are better for you than raw ones: the heat causes more of the antioxidant properties to be released.
2. Don’t store tomatoes in the fridge!The cold damages their delicate cell membranes. Instead leave at room temperature and to keep them from rotting to quickly – put them stem down.
3. The leaves of tomato plant can actually add a vibrant “fresh tomatoaroma” to pasta sauces.e Use like fresh basil.
4. Eating cooked tomatoes may act as a kind of internal sunscreen. They help block UV rays, but don’t toss the sunscreen, tomatoes are only a supplement not a replacement.
5. When tomatoes arrived in Italy in the mid-1500’s they were originally grown not to eat but for a garden decoration.
(Glad that idea didn’t last, aren’t you?)
Controlling Powdery Mildew Organically

Powdery mildew is a fungal disease that affects a wide range of plants. Powdery mildew diseases are caused by many different species of fungi in the order Erysiphales. It is one of the easier diseases to spot, as its symptoms are quite distinctive. Infected plants display white powdery spots on the leaves and stems. The lower leaves are the most affected, but the mildew can appear on any above-ground part of the plant. As the disease progresses, the spots get larger and denser as large numbers of asexual spores are formed, and the mildew may spread up and down the length of the plant. Powdery mildew grows well in environments with high humidity and moderate temperatures. In an agricultural setting, the pathogen can be controlled using chemical methods, genetic resistance, and careful farming methods. It is important to be aware of powdery mildew and its management as the resulting disease can significantly reduce crop yields.
http://en.wikipedia.org/wiki/Powdery_mildew
Using Milk to Prevent Powdery Mildew
Wednesday, May 16, 2012 by Barbara Pleasant
Squash leaves can be susceptible to powdery mildew
You don’t have to garden long to become acquainted with the disease called powdery mildew, which creates whitish patches on the leaves of pumpkin, winter squash, and other members of the cucumber family. A fast-growing fungus, powdery mildew is also among the worst enemies of rosemary, and is a well-known disease of monarda, grape, and zinnia. Each of these unrelated plants hosts a different strain of powdery mildew, but I have found that they all can be controlled with regular sprays of milk and water.
What is Powdery Mildew?
To understand how milk sprays prevent powdery mildew and thus use them most effectively, you must first understand your enemy. Powdery mildew fungi are present in many environments, so that even in the cleanest gardens, outbreaks can begin from spores spread by windblown rain, or on the feet of insects and birds. But when the right strain of powdery mildew finds a suitable host plant, it quickly sinks root-like structures into the cells on the leaf’s surface. There is stays, taking nutrition from the leaf while developing a matrix of thread-like structures over the surface. This is when we gardeners notice unusual patches of white or light gray with a powdery or furry texture, usually on the top sides of leaves.
Full Blog Here ~ http://www.growveg.com/growblogpost.aspx?id=242
See Also …
Powdery Mildew ~ Steps to prevention
http://www.organicgardening.com/learn-and-grow/powdery-mildew
Fungicide Spray Removal With Organic Milk for Powdery Mildew
http://homeguides.sfgate.com/fungicide-spray-removal-organic-milk-powdery-mildew-49341.html
How to Kill Powdery Mildew Spores in the Soil
http://homeguides.sfgate.com/kill-powdery-mildew-spores-soil-74601.html
Powdery mildew Aussie Organic
http://aussieorganicgardening.com/2009/10/powdery-mildew/
Chard ~ Planting, Growing and Harvesting ~ How to

Chard (Beta vulgaris subsp. cicla), is a leafy green vegetable often used in Mediterranean cooking. The leaves can be green or reddish in color like Bibb Lettuce; chard stalks also vary in color. Chard has been bred to have highly nutritious leaves and is considered to be one of the most healthful vegetables available, making it a popular addition to healthful diets (like other green leafy vegetables). Chard has been around for centuries, but because of its similarity to beets it is difficult to determine the exact evolution of the different varieties of chard.
http://en.wikipedia.org/wiki/Chard

Botanical name: Beta vulgaris
Plant type: Vegetable
Sun exposure: Full Sun, Part Sun
Soil type: Loamy
Bloom time: Summer
Chard is a member of the beet family that does well in both cool and warm temperatures. It can be cooked or used raw in salads and is high in vitamins A and C.
Planting
Plant chard seeds 2 to 3 weeks before the last spring frost date. Continue planting seeds at 10-day intervals for a month.
For a fall harvest, plant chard seeds again about 40 days before the first fall frost date.
Before planting, mix 1 cup of 5-10-10 fertilizer into the soil for every 20 feet of single row.
Plant the seeds 1/2 to 3/4 of inch deep in well-drained, rich, light soil. Space the seeds about 18 inches apart in single rows or 10 to 18 inches apart in wide rows. Sow eight to ten seeds per foot of row.
Care
When the plants are 3 to 4 inches tall, thin them out so that they are 4 to 6 inches apart or 9 to 12 inches apart if the plants are larger.
Water the plants evenly to help them grow better. Water often during dry spells in the summer. You can also mulch the plants to help conserve moisture.
For the best quality, cut the plants back when they are about 1 foot tall. If the chard plants become overgrown, they lose their flavor.
Pests
Leaf minor
Slugs
Aphids
Harvest/Storage
You can start harvesting when the plants are 6 to 8 inches tall. Cut off the outer leaves 1-1/2 inches above the ground with a sharp knife.
If you harvest the leaves carefully, new leaves will grow and provide another harvest.
You can cut the ribs off the chard leaves and cook them like asparagus.
The rest of the leaves are eaten as greens. You can cook them like spinach or eat them raw.
You can store chard in the refrigerator in ventilated plastic bags.
Recommended Varieties
‘Lucullus’, which is heat tolerant.
‘Ruby’, which can be a beautiful addition to your garden due to its bright red stems.
‘Bright Lights’, which has multicolored stems.
Recipes
Swiss Chard and Pasta Soup with Turkey Meatballs
http://www.almanac.com/plant/chard


How to Grow Tomatoes

The tomato is the edible, often red fruit/berry of the nightshade Solanum lycopersicum, commonly known as a tomato plant. The species originated in the South American Andes and its use as a food originated in Mexico, and spread throughout the world following the Spanish colonization of the Americas. Its many varieties are now widely grown, sometimes in greenhouses in cooler climates.
The tomato is consumed in diverse ways, including raw, as an ingredient in many dishes, sauces, salads, and drinks. While it is botanically a fruit, it is considered a vegetable for culinary purposes (as well as under U.S. customs regulations, see Nix v. Hedden), which has caused some confusion. The fruit is rich in lycopene, which may have beneficial health effects.
The tomato belongs to the nightshade family, Solanaceae. The plants typically grow to 1–3 meters (3–10 ft) in height and have a weak stem that often sprawls over the ground and vines over other plants. It is a perennial in its native habitat, although often grown outdoors in temperate climates as an annual. An average common tomato weighs approximately 100 grams (4 oz).
http://en.wikipedia.org/wiki/Tomato

Botanical name: Lycopersicon esculentum
Plant type: Vegetable
USDA Hardiness Zones: 2, 3, 4, 5, 6, 7, 8, 9, 10
Sun exposure: Full Sun
Soil type: Loamy
Soil pH: Acidic
Tomatoes are America’s favorite garden vegetable. (Yes, we technically eat the fruit of the tomato plant, but it’s used as a vegetable in eating and cooking and, thus, usually categorized in vegetables.)
This vine plant is fairly easy to grow and will produce a bumper crop with proper care. Its uses are versatile, however, tomatoes are susceptible to a range of pests and diseases.
Planting
If you’re planting seeds (versus purchasing transplants), you’ll want to start your seeds indoors 6 to 8 weeks before the average last spring frost date. See our post on “Tomatoes From Seed the Easy Way.”
Select a site with full sun and well-drained soil. For northern regions, is is VERY important that your site receives at least 6 hours of sun. For souther regions, light afternoon shade will help tomatoes survive and thrive.
Two weeks before transplanting seedlings outdoors, till soil to about 1 foot and mix in aged manure, compost, or fertilizer.
Harden off transplants for a week before moving outdoors.
Transplant after last spring frost when the soil is warm. See our Best Planting Dates for Transplants for your region.
Establish stakes or cages in the soil at the time of planting. Staking keeps developing fruit off the ground, while caging let’s the plant hold itself upright. Some sort of support system is recommended, but sprawling can also produce fine crops if you have the space, and if the weather cooperates.
Plant seedlings two feet apart.
Pinch off a few of the lower branches on transplants, and plant the root ball deep enough so that the remaining lowest leaves are just above the surface of the soil.
Water well to reduce shock to the roots.
Care
Water generously for the first few days.
Water well throughout growing season, about 2 inches per week during the summer. Keep watering consistent!
Mulch five weeks after transplanting to retain moisture.
To help tomatoes through periods of drought, find some flat rocks and place one next to each plant. The rocks pull up water from under the ground and keep it from evaporating into the atmosphere.
Fertilize two weeks prior to first picking and again two weeks after first picking.
If using stakes, prune plants by pinching off suckers so that only a couple stems are growing per stake.
Practice crop rotation from year to year to prevent diseases that may have over wintered.
Pests
Tomatoes are susceptible to insect pests, especially tomato hornworms and whiteflies. Link to our pest & problem pages below.
Aphids
Flea Beetles
Tomato Hornworm
Whiteflies
Blossom-End Rot
Late Blight is a fungal disease that can strike during any part of the growing season. It will cause grey, moldy spots on leaves and fruit which later turn brown. The disease is spread and supported by persistent damp weather. This disease will overwinter, so all infected plants should be destroyed. See our blog on “Avoid Blight With the Right Tomato.”
Tobacco Mosaic Virus creates distorted leaves and causes young growth to be narrow and twisted, and the leaves become mottled with yellow. Unfortunately, infected plants should be destroyed (but don’t put them in your compost pile).
Cracking: When fruit growth is too rapid, the skin will crack. This usually occurs in uneven water or uneven moisture due to weather conditions (very rainy periods mixed with dry periods). Keep moisture levels constant with consistent watering and mulching.
Harvest/Storage
Leave your tomatoes on the vine as long as possible. If any fall off before they appear ripe, place them in a paper bag with the stem up and store them in a cool, dark place.
Never place tomatoes on a sunny windowsill to ripen; they may rot before they are ripe!
The perfect tomato for picking will be firm and very red in color, regardless of size, with perhaps some yellow remaining around the stem. A ripe tomato will be only slightly soft.
If your tomato plant still has fruit when the first hard frost threatens, pull up the entire plant and hang it upside down in the basement or garage. Pick tomatoes as they redden.
Never refrigerate fresh tomatoes. Doing so spoils the flavor and texture that make up that garden tomato taste.
To freeze, core fresh unblemished tomatoes and place them whole in freezer bags or containers. Seal, label, and freeze. The skins will slip off when they defrost.
Recommended Varieties

Tomatoes grow in all sizes, from tiny “currant” to “cherry” to large “beefsteak.” There are hundreds of varieties to suit different climates and tastes. Here are a few of our favorites:
‘Amish Paste’: Large paste tomatoes, good slicers.
‘Brandywine’: A beefsteak with perfect acid-sweet combination. Many variants are available.
‘Matt’s Wild Cherry’: Foolproof in any climate, cherries bear abundant fruit in high or low temps and in rain or drought.
For more about tomato varieties, see our post on “Tomato Trials: from blue to grafted; what grew this summer.”
Recipes
Broiled Parmesan Tomatoes
Deb’s Fresh Tomato Sauce
Carrot-Tomato Bisque
Fried Green Tomatoes
Blue Corn Chips with Goat Cheese, Corn, and Tomato Salsa
Tomato Jam
Pasta with Tuna, Tomatoes, and Olives
Cooking Notes
Capture the garden-fresh taste of tomatoes all year long! See this helpful post on how to can tomatoes.
Wit & Wisdom
In 1522, Spanish explorers returned home from the New World with tomatoes. Wealthy people believed that the fruits were poisonous. Only the peasants were brave (and hungry) enough to eat them.
Ease a headache by drinking tomato juice blended with fresh basil.
http://www.almanac.com/plant/tomatoes

![]()
Sweet and Spicy Fresh Salsa w/ Homemade Tortilla Chips

Make this salsa as sweet and as spicy as you’d like!
Ingredients
Chopped Onion, your preference, yellow, white, red
1 clove Garlic, Minced
(½ bunches Cilantro-washed) if you like cilantro, and to taste
Jalapeno/s (as hot as you would like it, leaving seeds and ribs increases heat)
16 oz peeled diced tomatoes (Romas work great for salsa)
(2 teaspoons, more or less to taste) Sugar
1 Tablespoon White Vinegar
1 pinch Dried Oregano
3 dashes Salt And Pepper, to taste
1 pinch Cumin
Juice of half a Lime
Preparation
Chop and dice all ingredients, (you can use food processor if you like, pulse until desired consistency is reached). Refrigerate in an air tight container until ready to serve (overnight is best for flavors to marry). Serve with fresh chips.
Homemade Corn Tortilla Chips!
http://copykatcook.blogspot.com/2012/02/homemade-tortilla-chips.html
(caution when handling jalapenos you might want to wear gloves to protect your skin, can burn)

How to Make Homemade Roasted Peppers

using hot or sweet peppers, including Bell, banana, chilies, jalapeno, and pimiento’s
Click here for a PDF print version!
Roasted peppers are expensive in the grocery stores; but they’re EASY to make at home! Here’s how to make your own roasted peppers! The directions are complete with instructions in easy steps and completely illustrated. While it is not considered safe by the USDA, FDA and University food science labs to can them at home, you can refrigerate them or freeze them!
Prepared this way, the roasted peppers have a fridge shelf life of about 2 months.
Directions for Making Roasted Peppers
Ingredients and Equipment
- Peppers (see step 1)
- Gar or charcoal grill or an oven or a stovetop (called a “cooker” in the U.K.)
- Tongs
Optional:
Seasoning: herbs d’ Provence, Italian spices, basil, Thyme, whatever you like!
Rubber or latex gloves (if your skin is sensitive to capsicum!)
Recipe and Directions
Wash the peppers!I’m sure you can figure out how to rinse the peppers in plain cold or lukewarm water.
Step 1 – Selecting the peppers
The most important step! You need peppers that are FRESH and crisp. Limp, old peppers will make nasty tasting roasted peppers. Guests will probably throw them at you.. Select filled but tender, firm, crisp peppers. Remove and discard any soft, diseased, spotted and rusty pods. Select small peppers, preferably 1 inch to 1 and ¼-inch in diameter. Larger peppers are often too fibrous and tough.
Hot pepper caution: Wear plastic or rubber gloves and do not touch your face while handling or cutting hot peppers. If you do not wear gloves, wash hands thoroughly with soap and water before touching your face or eyes. Hot peppers can burn your eyes and skin – ever heard of pepper spray?

Step 3 – Cut the stem end off the peppers and remove the seeds
Small peppers may be left whole. Large peppers may be quartered. Remove cores and seeds. Slash two or four slits in each pepper
Step 4 – Blister the peppers
Peppers have a skin that turns REALLY tough when you can the peppers, so you’ve got to remove the skin before canning. Fortunately, there is an easy trick to remove the skins. It’s called “blistering”. Just heat up a fry pan to medium hot, and lay the peppers in there skin side down. In just a few minutes, the skin will start bubble up and darken – that’s blistering – once cooled, the skin peels off easily by hand.
Here are some other methods for how to blister peppers:
Outdoor grill method: this is the easiest method – Place peppers on a charcoal or gas grill about 5 to 6 inches above glowing coals; using tongs carefully turn peppers frequently (skin side down if they are cut up), exposing all surfaces to the heat source until skin blisters evenly on all sides.
Oven or broiler method: Place peppers in a hot oven or broiler set at 400º to 450ºF (205º to 232ºC) for 6 to 8 minutes; using tongs carefully turn pepper often until skin blisters evenly on all sides.
Stove top method: Place peppers on wire mesh over a hot electric or gas burner; using tongs carefully turn peppers frequently, exposing all surfaces to the heat source until skin blisters evenly on all sides.
Microwave oven method: Place peppers in a microwave safe dish; cover with secure air-tight lid to allow for steam build up. Place container on rotating plate in the center of the oven, then microwave for 7 to 8 minutes depending the oven wattage and power level (settings may vary depending on microwave oven used). The blistering is not visible with this method. However, the skin will have a tougher, more brittle texture compared to the raw pepper. Allow steam to fully develop in the covered container for 1to 2 minutes after microwave cooking. Caution: The hot steam will be released from container when the lid is opened – don’t get burned!


Step 5 – Allow the peppers to cool
Allow them to cool until you can comfortably handle them (about 20 to 30 minutes). You don’t want to burn your hands, do you? Allow the peppers to cool by placing them in a pan and cover with a damp cloth. This will make peeling the peppers easier.
A visitor writes on August 16, 2009: “My husband learned to roast peppers from his mother which is using the outdoor grill method that you describe. But he was able to also teach his mother a new trick. After you take the peppers off of the grill, place in a paper bag and allow to cool. The skins peel right off. I think it works the same as what you do with the towel.
Step 6 – Peeling the Peppers
Then pull the blistered skin off the rest of the pepper with a gentle tug and an occasional rinse with water. In areas of the pepper where the blistering was not complete, just scrape the skin off with a knife or vegetable peeler.


Step 7 – Finish up!
You can rinse the peppers under the facet to get off any remaining seeds or debris, if you wish, or just scrape them with a knife! they’re ready to eat! You can also season them with olive oil and spices, typically Italian seasonings like oregano, thyme, basil!
Keep them in the refrigerator for up to 2 months, or freeze them in ziploc bags (or better still, vacuum bags)
Other Equipment:
From left to right:
- Jar lifting tongs
helpful to pick up hot jars - Lid lifter
– to remove lids from the pot
of hot water - Lid
– disposable – you may only
use them once - Ring
– holds the lids on the jar until after
the jars cool – then you don’t need them - Canning jar funnel
– to fill the jars

How many peppers and where to get them
You can grow your own, pick your own, or buy them at the grocery store. An average of 9 pounds is needed per canner load of 9 pints jars. A bushel of peppers weighs 25 pounds and yields 20 to 30 pints canned; an average of 1 pound per pint

Mint ~ Mentha Plant Care Guide

Mentha (also known as mint, from Greek míntha, Linear B mi-ta) is a genus of plants in the family Lamiaceae (mint family). The species are not clearly distinct and estimates of the number of species varies from 13 to 18. Hybridization between some of the species occurs naturally. Many other hybrids, as well as numerous cultivars, are known in cultivation.
The genus has a subcosmopolitan distribution across Europe, Africa, Asia, Australia, and North America.
Mints are aromatic, almost exclusively perennial, rarely annual, herbs. They have wide-spreading underground and overground stolons and erect, square, branched stems. The leaves are arranged in opposite pairs, from oblong to lanceolate, often downy, and with a serrated margin. Leaf colors range from dark green and gray-green to purple, blue, and sometimes pale yellow. The flowers are white to purple and produced in false whorls called verticillasters. The corolla is two-lipped with four subequal lobes, the upper lobe usually the largest. The fruit is a nutlet, containing one to four seeds.
While the species that make up the Mentha genus are widely distributed and can be found in many environments, most grow best in wet environments and moist soils. Mints will grow 10–120 cm tall and can spread over an indeterminate area. Due to their tendency to spread unchecked, some mints are considered invasive.
http://en.wikipedia.org/wiki/Mentha
~~~~~~~~~~~~~~~~~~~~~~~~~~~~

Botanical name: Mentha
Plant type: Herb
Sun exposure: Full Sun
Soil type: Loamy
Mint is a perennial with very fragrant, toothed leaves and tiny purple, pink, or white flowers. It has a fruity, aromatic taste. The mint family has many varieties, but it will take over your garden, so be careful where you plant it.
Planting
- For growing outdoors, plant one or two purchased plants (or one or two cuttings from a friend) about 2 feet apart in moist soil. One or two plants will easily cover the ground. Mint should grow to be 1 or 2 feet tall.
- In the garden, plant mint near cabbage and tomatoes.
- If you don’t want an entire bed of mint, buy some plants or take some cuttings from a friend and plant them in containers filled with potting mix enriched with compost. Remember to keep the plants in a sunny spot.
Care
- Minimal care is needed for mint. For outdoor plants, use a light mulch. This will help keep the soil moist and keep the leaves clean.
- For indoor plants, be sure to water them regularly to keep the soil evenly moist.
Pests
- Powdery mildew
- Rust
- Leaf spot
- Anthracnose
- Stem canker
Harvest/Storage
- Right before flowering, cut the stems 1 inch from the ground. You can harvest one mint plant two or three times in one growing season.
- You can also just pick the leaves as you need them.
- You can grow the plants indoors for fresh leaves throughout the winter. If you want to dry them, it’s best to cut the leaves right before flowering. Store the dried leaves in an airtight container.
Recommended Varieties
- Spearmint, which is the type most commonly used in cooking
- Peppermint, for a strong aroma

Recipes
Wit & Wisdom
- Mice dislike the smell of peppermint. Spread it liberally where you suspect the critters.
- To relieve a tension headache, apply a compress of mint leaves to your forehead.


How to Plant & Germinate Eggplant : Garden Seed Starting

Eggplant (Solanum melongena) is a species of nightshade commonly known in British English as aubergine and also known as melongene, garden egg, or guinea squash. It is known in South Asia, Southeast Asia and South Africa as brinjal. It bears a fruit of the same name (commonly either “eggplant” in American and Australian English or “aubergine” in British English) that is widely used in cooking, most notably as an important ingredient in dishes such as moussaka and ratatouille. As a member of the genus Solanum, it is related to both the tomato and the potato. It was originally domesticated in India and Bangladesh from the wild nightshade, the thorn or bitter apple, S. incanum.
http://en.wikipedia.org/wiki/Eggplant
~~~~~~~~~~~~~~~~~~
Botanical name: Solanum melongena
Plant type: Vegetable
USDA Hardiness Zones: 4, 5, 6, 7, 8, 9, 10
Sun exposure: Full Sun
Soil type: Sandy
Soil pH: Slightly Acidic to Neutral
Eggplants are short-lived perennial vegetables, but are usually cultivated as annuals. Also known as aubergines, eggplants differ mainly in size, shape and color of the fruits. Eggplants are tropical and subtropical, requiring relatively high temperatures. Related crop include tomatoes, potatoes and peppers.
Planting
- Start plants indoors 2 months before the soil warms up or buy nursery transplants just before planting.
- Place 3 to 4 inch tall seedlings 24 to 30 inches apart in well-prepared beds.
- Pinch out the terminal growing points for a bushier plant.
Care
- Stake plants over 24 inches tall.
- Water well and apply a balanced fertilizer every two weeks during the growing season.
- For bigger fruits, restrict to five or six per plant.
Pests
- Aphids
- Spider Mites
- Tomato Hornworms
- Downy and Powdery Mildew
- Eggplant fruit may not ripen properly due to cold temperatures, pest damage, or infertile soils.
Harvest/Storage
- Harvest 16 to 24 weeks after sowing when the skin of the fruit is shiny and unwrinkled.
- Cut the fruit close to the stem, but leaving about an inch of it attached.
- Eggplants can be stored for up to two weeks in humid conditions no lower than 50 degrees F.
Recommended Varieties
- ‘Black Beauty’
- ‘Easter Egg’
- ‘Little Fingers’
Recipes
Wit & Wisdom
At one time, women in the Orient used a black dye to stain their teeth a gun metal gray. The dye probably came from the same dark purple eggplant we see in the marketplace today.
http://www.almanac.com/plant/eggplant


See Also
Eggplants in containers

Genetically-modified eggplant found to be unsafe for human consumption, Environment
Genetically-modified eggplant found to be unsafe for human consumption, Environment
Bell Peppers Plant Care Guide ~ Seeds to garden ~ How to

Botanical name: Capsicum annuum
Plant type: Vegetable
USDA Hardiness Zones: 1, 2, 3, 4, 5, 6, 7, 8, 9, 10, 11
Sun exposure: Full Sun
Soil type: Loamy
Soil pH: Neutral
Peppers are a tender, warm-season crop. They resist most pests and offer something for everyone: spicy, sweet or hot, and a variety of colors, shapes and sizes. For this page, we will focus on sweet bell peppers.
Planting
- Start seeds indoors 8-10 weeks before last spring frost date.
- The temperature must be at least 70 degrees F for seed germination, so keep them in a warm area for the best and fastest results.
- Start pepper seeds three to a pot, and thin out the weakest seedling. Let the remaining two pepper plants spend their entire lives together as one plant. The leaves of two plants help protect peppers against sunscald, and the yield is often twice as good as two segregated plants.
- Begin to harden off plants about 10 days before transplanting.
- A week before transplanting, introduce fertilizer or aged compost in your garden soil.
- After the danger of frost has passed, transplant seedlings outdoors, 18 to 24 inches apart (but keep paired plants close to touching.)
- Soil should be at least 65 degrees F, peppers will not survive transplanting at temps any colder. Northern gardeners can warm up the soil by covering it with black plastic.
- Put two or three match sticks in the hole with each plant, along with about a teaspoon of fertilizer. They give the plants a bit of sulfur, which they like.
Care
- Soil should be well-drained, but maintain adequate moisture either with mulch or plastic covering.
- Water one to two inches per week, but remember peppers are extremely heat sensitive. If you live in a warm or desert climate, watering everyday may be necessary.
- Fertilize after the first fruit set.
- Weed carefully around plants.
- If necessary, support plants with cages or stakes to prevent bending. Try commercially available cone-shaped wire tomato cages. They may not be ideal for tomatoes, but they are just the thing for peppers.
- For larger fruit, spray the plants with a solution of one tablespoon of Epsom salts in a gallon of water, once when it begins to bloom, and once ten days later.
Pests
- Aphids
- Flea Beetles
- Cucumber Mosaic Virus
- Blossom End Rot appears as a soft, sunken area which turns darker in color.
- Pollination can be reduced in temperatures below 60F and above 90F.
- Too much nitrogen will reduce fruit from setting.
Harvest/Storage
- Harvest as soon as peppers reach desired size.
- The longer bell peppers stay on the plant, the more sweet they become and the greater their Vitamin C content.
- Use a sharp knife or scissors to cut peppers clean off the plant for the least damage.
- Peppers can be refrigerated in plastic bags for up to 10 days after harvesting.
- Bell peppers can be dried, and we would recommend a conventional oven for the task. Wash, core, and seed the peppers. Cut into one-half-inch strips. Steam for about ten minutes, then spread on a baking sheet. Dry in the oven at 140 degrees F (or the lowest possible temperature) until brittle, stirring occasionally and switching tray positions. When the peppers are cool, put them in bags or storage containers.
Recommended Varieties
Look for varieties that ripen to their full color quickly; fully mature peppers are the most nutritious—and tastier, too!
- Green to Red: ‘Lady Bell’, ‘Gypsy,’ ‘Bell Boy,’ ‘Lipstick’
- Yellow: ‘Golden California Wonder’
Recipes

Wit & Wisdom
The popular green and red bell peppers that we see in supermarkets are actually the same thing; the red peppers have just been allowed to mature on the plant longer, changing color and also gaining a higher content of Vitamin C.

~~~~~~~~~~~~~~~~~~~~~~~~~~~~~~~~~~~~~~~~~~~~~~~~~~~~~~~~~~~~~~~~
See Also
How to Grow Peppers in a Container
Tomatillo (Physalis philadelphica) ~ Tomatillo Plant Care Guide


The tomatillo (Physalis philadelphica) is a plant of the nightshade family, related to the cape gooseberry, bearing small, spherical and green or green-purple fruit of the same name. Tomatillos originated in Mexico, and are a staple of that country’s cuisine. Tomatillos are grown as annuals throughout the Western Hemisphere. Tomatillos are delicious when fried, boiled and steamed.
The tomatillo fruit is surrounded by an inedible, paper-like husk formed from the calyx. As the fruit matures, it fills the husk and can split it open by harvest. The husk turns brown, and the fruit can be several colors when ripe, including yellow, red, green, or even purple. Tomatillos are the key ingredient in fresh and cooked Mexican and Central-American green sauces. The freshness and greenness of the husk are quality criteria. Fruit should be firm and bright green, as the green color and tart flavor are the main culinary contributions of the fruit. Purple and red-ripening cultivars often have a slight sweetness, unlike the green- and yellow-ripening cultivars, and are therefore somewhat more suitable for fruit-like uses like jams and preserves. Like their close relatives cape gooseberries, tomatillos have a high pectin content. Another characteristic is they tend to have a varying degree of a sappy sticky coating, mostly when used on the green side out of the husk.
Tomatillo plants are highly self-incompatible, and two or more plants are needed for proper pollination. Thus, isolated tomatillo plants rarely set fruit. Research conducted by Kamla Kant Pandey in 1957 supports this fact. Ripe tomatillos will keep refrigerated for about two weeks. They will keep even longer if the husks are removed and the fruits are placed in sealed plastic bags stored in the refrigerator. They may also be frozen whole or sliced.
http://en.wikipedia.org/wiki/Tomatillo


Growing tomatillos is very similar to growing tomatoes, as a cage or trellis is required for the vine to climb, they are started by the seed in warm soil, and they thrive in full, hot sun. Grow a tomatillo vine to use in cooking with helpful advice from a sustainable gardener in this free video on gardening.
Read more: http://www.ehow.com/video_4755723_grow-tomatillos.html#ixzz2zr5uOmAW

Tomatillo: A Growing Guide
Learn how to grow these amazing husked vegetables—and how to make a tasty green salsa.
http://www.organicgardening.com/learn-and-grow/tomatillo-growing-guide
The garlic said to the onion, “You Stink” ~ Everything about Planting Garlic ~ Health Benefits

Allium sativum, commonly known as garlic, is a species in the onion genus, Allium.
Its close relatives include the onion, shallot, leek, chive, and rakkyo. With a history of human use of over 7,000 years, garlic is native to central Asia, and has long been a staple in the Mediterranean region, as well as a frequent seasoning in Asia, Africa, and Europe. It was known to Ancient Egyptians, and has been used for both culinary and medicinal purposes.
http://en.wikipedia.org/wiki/Garlic
 Botanical name: Allium sativum
Plant type: Vegetable
USDA Hardiness Zones: 3, 4, 5, 6, 7, 8
Sun exposure: Full Sun
Soil type: Loamy
Soil pH: Slightly Acidic to Neutral
Garlic is easy to grow and produces numerous bulbs after a long growing season. It is frost tolerant. Beyond its intense flavor and culinary uses, “the stinking rose” is good in the garden as an insect repellent and has been used for centuries as a home remedy.
Planting
- Garlic can be planted in the spring as soon as the ground can be worked, but fall planting is recommended for most gardeners. Plant in the fall and you’ll find that your bulbs are bigger and more flavorful when you harvest the next summer.
- In areas that get a hard frost, plant garlic 6 to 8 weeks before that frost. In southern areas, February or March is a better time to plant.
- Break apart cloves from bulb a few days before planting, but keep the papery husk on each individual clove.
- Plant cloves about one month before the ground freezes.
- Do not plant cloves from the grocery store. They may be unsuited varieties for your area, and most are treated to make their shelf life longer, making them harder to grow. Instead, get cloves from a mail order seed company or a local nursery.
- Ensure soil is well-drained with plenty of organic matter. Select a sunny spot.
- Place cloves 4 inches apart and 2 inches deep, in their upright position (the wide root side facing down and pointed end facing up).
- In the spring, as warmer temperatures come, shoots will emerge through the ground.
Care
- Northern gardeners should mulch heavily with straw for overwintering.
- Mulch should be removed in the spring after the threat of frost has passed. (Young shoots can’t survive in temps below 20°F on their own. Keep them under cover.)
- Cut off any flower shoots that emerge in spring. These may decrease bulb size.
- Weeds should not be a problem until the spring. Weed as needed.
- Garlic requires adequate levels of nitrogen. Fertilize accordingly, especially if you see yellowing leaves.
- Water every 3 to 5 days during bulbing (mid-May through June).
- A note on garlic scapes: Some folks love cooking the scapes (the tops of hardneck garlic). Whether you trim the scapes or let them keep growing is your preference. We like to stir fry scapes the way we cook green beans—similar with a spicy kick!
Pests
Garlic has very few problems with pests in the garden (in fact, its a natural pest repellent!), and also very few problems with the diseases that plague other veggies. White Rot is one concern, but you should also keep an eye out for the same pests that plague onions.
- White Rot is a fungus that may attack garlic in cool weather. Not much can be done to control or prevent that problem except rotating your crops and cleaning up the area after harvesting. The spores can live in the soil for many years. The fungus affects the base of the leaves and roots.
Harvest/Storage
- Harvest time depends on when you plant, but the clue is to look for yellow tops. Harvest when the tops begin to yellow and fall over, before they are completely dry.
- In Northern climates, harvesting will probably be in late July or August. In Southern climates, it will depend on your planting date.
- Check the bulb size and wrapper quality; you don’t want the wrapper to disintegrate. Dig too early and the bulb will be immature. Discontinue watering.
- To harvest, carefully lift the bulbs with a spade or garden fork. Pull the plants, carefully brush off the soil, and let them cure in an airy, shady spot for two weeks. We hang them upside down on a string in bunches of 4 to 6. Make sure all sides get good air ciculation.
- The bulbs are cured and ready to store when the wrappers are dry and papery and the roots are dry. The root crown should be hard, and the cloves can be cracked apart easily.
- Once the garlic bulbs are dry, you can store them. Remote any dirt and trim off any roots or leaves. Keep the wrappers on—but remote the dirtiest wrappers.
- Garlic bulbs may be stored individually with the tops removed, or the dried tops may be braided together to make a garlic braid to hang in the kitchen or storage room.
- Bulbs should be stored in a cool (40 degrees F), dark, dry place, and can be kept in the same way for several months. Don’t store in your basement if it’s moist!
- The flavor will increase as the bulbs are dried.
- If you plan on planting garlic again next season, save some of your largest, best-formed bulbs to plant again in the fall.
Recommended Varieties
There are three types of varieties of garlic: Softneck, Stiffneck, and Great-headed (Elephant). Most types are about 90 days to harvest.
- Softneck varieties, like their name suggests, have necks that stay soft after harvest, and therefore are the types that you see braided. Especially recommended for those in warmer climes, as it is less winter-hardy than other types. Strong, intense flavor. Recommended varieties: ‘Persian Star’, ‘Mother of Pearl’
- Stiffneck varieties grow one ring of cloves around a stem, there is not a layer of cloves as there are in softneck varieties. They are extremely cold hardy, but do not store as well or long as other varieties. Flavor is more mild than softnecks. Recommended Variety: ‘Carpathian’
- Great-headed varieties are not recommended. They are less hardy, and more closely related to leeks than other varieties. Their flavor is more like onion than traditional garlic. Bulbs and cloves are large, with about 4 cloves to a bulb.
Recipes
- Broccoli-Garlic Saute
- Roasted Garlic Mashed Potatoes
- Garlic and Wine Scallops
- Garlic Fries
- Cranberry-Teriyaki Chicken on Garlic Bok Choy
Wit & Wisdom
A nickel will get you on the subway, but garlic will get you a seat.
–Yiddish proverb
Rub raw garlic on an insect bite to relieve the sting or itch.
http://www.almanac.com/plant/garlic
more here

Garlic Planting Guide ~ Garlic in Containers @ Auntie’s Here 😉
~~~~~~~~~~~~~~~~~~~~~~~~~~~~~~~~~~~~~~~~~~~~~~~~~~~~~~~~~~~~~~~~~~~~~~~~~~~~~
 Garlic is a wonderful and powerful savory addition. It jazzes up many recipes and also contains healing properties. Truly fresh garlic is pungent, white, hard and full of a juicy liquid. I believe that much of the garlic that is sold in stores has gone past its peak (rubbery or soft) and has lost much of its medicinal value. One way to maintain not only its flavor but also its healing powers is to dry it and make it into garlic powder.
http://www.almanac.com/blog/celestes-garden/making-garlic-powder

Six reasons garlic is an amazing healing superfood
Learn more: http://www.naturalnews.com/041476_garlic_superfood_natural_healing.html#ixzz2xy2Jf7e1
How to Deter Mosquitoes and Other Bugs

They’re here! With the early spring weather, a bumper crop of blood-thirsty black flies and mosquitoes have appeared, too! All insects have a purpose but some are awfully annoying to humans! Here’s how to deter mosquitoes and other bugswhile you enjoy the great outdoors.
We all know about store-brand products, so we’re going to tell you how to fend off those pesky insects with safe, non-toxic repellents.
http://www.almanac.com/content/how-deter-mosquitoes-and-other-bugs
Okra Plant Care Guide ~ Health Benefits

Okra (US /ˈoʊkrə/ or UK /ˈɒkrə/; Abelmoschus esculentus Moench), known in many English-speaking countries as ladies’ fingers, bhindi, bamia, or gumbo, is a flowering plant in the mallow family. It is valued for its edible green seed pods. The geographical origin of okra is disputed, with supporters of South Asian, Ethiopian and West African origins. The plant is cultivated in tropical, subtropical and warm temperate regions around the world.
http://en.wikipedia.org/wiki/Okra

Botanical name: Abelmoschus esculentus
Plant type: Vegetable
Sun exposure: Full Sun
Soil type: Loamy
Bloom time: Summer
Okra is traditionally a southern U.S. plant that thrives in warm weather. It is easy to grow and use and looks great throughout the growing season due to its beautiful flowers. Okra is also rich in vitamin A and low in calories.
Planting
- You can start okra seeds indoors in peat pots under full light 3 to 4 weeks before the last spring frost date.
- You can also start okra directly in your garden 3 to 4 weeks before the last spring frost date as long as you cover the plants with a cold frame or grow tunnel until the weather warms up. Make sure that the covering is 2 to 3 feet tall so that the plants have room to grow.
- If you do not start your okra plants early, wait until there is stable warm weather. You can plant okra in the garden when the soil has warmed to 65° to 70°F.
- Plant okra in fertile, well-drained soil in full light about 1/2 to 1 inch deep and 12 to 18 inches apart. You can soak the seeds overnight in tepid water to help speed up germination.
- If you are planting okra transplants, be sure to space them 1 to 2 feet apart to give them ample room to grow.
- Okra plants are tall, so be sure to space out the rows 3 to 4 feet apart.
Care
- Eliminate weeds when the plants are young, then mulch heavily to prevent more weeds from growing. Apply a layer of mulch 4 to 8 inches high. You should also side-dress the plants with 10-10-10, aged manure, or rich compost (1/2 pound per 25 feet of row). You could also apply a balanced liquid fertilizer monthly.
- When the seedlings are about 3 inches tall, thin the plants so that they are 10 to 18 inches apart.
- Keep the plants well watered throughout the summer months; 1 inch of water per week is ideal, but use more if you are in a hot, arid region.
- After the first harvest, remove the lower leaves to help speed up production.
Pests
- Aphids
- Corn earworms
- Stinkbugs
- Fusarium wilt
Harvest/Storage
- The first harvest will be ready about 2 months after planting.
- Harvest the okra when its about 2 to 3 inches long. Harvest it every other day.
- Cut the stem just above the cap with a knife; if the stem is too hard to cut, the pod is probably too old and should be tossed.
- Wear gloves and long sleeves when cutting the okra because most varieties are covered with tiny spines that will irritate your skin, unless you have a spineless variety. Do not worry: this irritation will not happen when you eat them.
- To store okra, put the uncut and uncooked pods into freezer bags and keep them in the freezer. You can then prepare the okra any way you like throughout the winter months.
Recommended Varieties
- ‘Annie Oakley’, which takes 52 days to mature and has spineless pods. It grows to about 5 feet tall.
- ‘Park’s Candelabra Branching’, which is a base-branching okra plant. This type of branching makes picking easy.
- ‘Louisiana Green Velvet’ is good for big areas; it is vigorous and its plants grow to be 6 feet tall. It is also smooth and spineless.
Recipes
http://www.almanac.com/plant/okra

Health benefits of okra
Thursday, September 19, 2013 by: Yanjun
(NaturalNews) Okra is available the entire year in the southern lands, but for Americans, it is only available during summer. The appearance of okra is comparable to that of a grooved pepper, and it belongs to the same genus as both cotton and hibiscus. Food experts said that the most likely origin of this vegetable is Africa, and it was transported from there to the United States about 300 years ago.
Learn more: http://www.naturalnews.com/042116_okra_health_benefits_nutritional_foods.html#ixzz2xfDKW3hg

Kohlrabi Plant Care Guide ~ Cool Season Vegetables

Kohlrabi (German turnip or turnip cabbage) (Brassica oleracea Gongylodes group) (Olkopi in Assamese and Bengali) (Monji Haak in Kashmiri) is an annual vegetable, and is a low, stout cultivar of cabbage. Kohlrabi can be eaten raw as well as cooked.
http://en.wikipedia.org/wiki/Kohlrabi
~~~~~~~~~~~~~~~~~~~~~~~~~~~~~~
Kohlrabi
 One of the oddest looking vegetables you can grow is kohlrabi. With its large, edible, bulbous stem sitting underneath big, cabbage-like leaves, it almost looks like some alien spacecraft that landed by accident in the middle of the vegetable garden! But the enlarged stem of this cabbage family member- its name means “cabbage turnip” in German- has a sweet, mild flavor that has been likened to a cross between a radish and a cucumber. It can be enjoyed crisp and raw, steamed, stir-fried or added to soups and stews. And even the leaves are edible- you cook them as you would kale.
About This Plant
The bulbous stem of the kohlrabi plant may be white, pale green or purple, depending on the variety. ‘Early Purple Vienna’ and ‘Early White Vienna’ are open-pollinated heirloom varieties. Some of the newer hybrid varieties are more heat and cold tolerant than these older varieties. Pale green ‘Winner’ and purple ‘Kolibri’ are heat tolerant selections that mature quickly.
Site Selection
Select a site with full sun and well-drained soil. Prepare the garden bed by using a garden fork or tiller to loosen the soil to a depth of 12 to 15 inches, then mix in a 2- to 4-inch layer of compost. Adjust the soil pH to 6.0 to 6.8.
Planting Instructions
Kohlrabi is a quick-maturing plant whose harvest season can be extended with successive plantings in spring and fall. For a spring crop, sow seeds about 4 weeks before the last frost date, making successive sowings while the weather stays cool. Plant in wide rows or beds, sowing seeds ½ inch deep and 3 inches apart. After the seedlings are a couple of inches tall, thin to a final spacing of 6 to 8 inches.
This fast-growing vegetable also makes a good fall crop in many parts of the country. Sow seeds directly in the garden 8 to 10 weeks before the first expected fall frost date. In warm winter areas (Zones 9 and 10), you can make repeat sowings during the fall for harvest in the winter and early spring.
Care
Be sure to keep the soil consistently moist; mulching is helpful. Your kohlrabi plants will appreciate a dose of fish emulsion fertilizer when they are about a month old. Floating row covers will keep away many of the pests that trouble members of the cabbage family, such as cabbage loopers and cabbageworms.
Harvesting
The best advice about harvesting kohlrabi is not to wait too long. Most varieties are ready for harvesting just 6 to 7 weeks from planting and are the most tender and flavorful when the bulbs are 2 to 4 inches in diameter. Fall crops that ripen in cool weather don’t get woody as readily and can be picked a little larger, up to 5 inches.
http://www.garden.org/plantguide/?q=show&id=3326
Kohlrabi ~ Vegetable (Cool Season) – Cabbage Family @ Explore Cornell Here

Spinach Plant Care Guide ~ Cool Season Vegetables

Spinach (Spinacia oleracea) is an edible flowering plant in the family of Amaranthaceae. It is native to central and southwestern Asia. It is an annual plant (rarely biennial), which grows to a height of up to 30 cm. Spinach may survive over winter in temperate regions. The leaves are alternate, simple, ovate to triangular-based, very variable in size from about 2–30 cm long and 1–15 cm broad, with larger leaves at the base of the plant and small leaves higher on the flowering stem. The flowers are inconspicuous, yellow-green, 3–4 mm diameter, maturing into a small, hard, dry, lumpy fruit cluster 5–10 mm across containing several seeds.
Common spinach, Spinacia oleracea, was long considered to be in the Chenopodiaceae family, but in 2003, the Chenopodiaceae family was combined with the Amaranthaceae family under the family name ‘Amaranthaceae’ in the order Caryophyllales. Within the Amaranthaceae family, Amaranthoideae and Chenopodioideae are now subfamilies, for the amaranths and the chenopods, respectively.
http://en.wikipedia.org/wiki/Spinach
Botanical name: Spinacia oleracea @ old farmer’s here
Plant type: Vegetable
USDA Hardiness Zones: 3, 4, 5, 6, 7, 8, 9
Sun exposure: Full Sun
Soil type: Loamy
Soil pH: Neutral
This super-cold-hardy vegetable is a tender crop that can be planted in very early spring as well as fall and winter. Spinach has similar growing conditions and requirements as lettuce, but it is more versatile in both its nutrition and its ability to be eaten raw or cooked. It is higher in iron, calcium, and vitamins than most cultivated greens, and one of the best sources of vitamins A, B, and C.
Planting
- Prepare the soil with aged manure about a week before planting, or, you may wish to prepare your spot in the fall so that you can sow the seeds outdoors in early spring as soon as the ground thaws.
- If you live in a place with mild winters, you can also plant in the fall.
- Although seedlings can be propagated indoors, it is not recommended as seedlings are difficult to transplant.
- Spring plantings can be made as soon as the soil can be properly worked. It’s important to seed as soon as you can to give spinach the required 6 weeks of cool weather from seeding to harvest.
- Select a site with full sun to light shade and well-drained soil.
- Sow seeds 1/2 inch to 1 inch deep, covering lightly with soil. Sow about 12 seeds per foot of row, or sprinkle over a wide row or bed.
- Soil should not be warmer than 70º F in order for germination.
- Successive plantings should be made every couple weeks during early spring. Common spinach cannot grow in midsummer.
- For summer types, try New Zealand Spinach and Malabar Spinach.
- Plant in mid-August for a fall crop, ensuring that soil temps are cool enough.
- Gardeners in northern climates can harvest early-spring spinach if it’s planted just before the cold weather arrives in fall. Protect the young plants with a cold frame or thick mulch through the winter, then remove the protection when soil temperature in your area reaches 40º.
- Water the new plants well in the spring.
Care
- Fertilize only if necessary due to slow growth, or use as a supplement if your soil’s pH is inadequate. Use when plant reaches 1/3 growth.
- When seedlings sprout to about two inches, thin them to 3-4 inches apart.
- Beyond thinning, no cultivation is necessary. Roots are shallow and easily damaged.
- Keep soil moist with mulching.
- Water regularly.
- Spinach can tolerate the cold; it can survive a frost and temps down to 15ºF.
Pests
- Leaf Miners
- Bolting
- Mosaic Virus/Blight
- Downy Mildew
Harvest/Storage
- Keep an eye on your plants. Harvest when leaves reach desired size.
- Don’t wait too long to harvest, or wait for larger leaves; bitterness will set in quickly after maturity.
- The whole plant can be harvested at once, and cut at the base, or leaves may be picked off plants one layer at a time, giving inner layers more time to develop.
Recommended Varieties
- ‘Giant Nobel’ is a plain leaf variety.
- ‘Winter Bloomsdale’ is a crinkled Leaf, fall variety, tolerant to mosaic viruses.
- ‘Tyee’ Can be planted in spring or fall, and is resistant to downy mildew.
Recipes
- Gnocchi Verde (Spinach Dumplings)
- Spinach Crêpes
- Cream of Spinach Soup
- Warm Chicken spinach Salad with Oranges, Dates, and Goat Cheese
- Betty Rand Bassetta’s Spinach Bars
Cooking Notes
A pinch of baking soda in the cooking water keeps spinach greener.
Spinach boosts your brainpower; it can hinder iron absorption. For better absorption of iron, eat spinach with orange slices.
Wit & Wisdom
On March 26, 1937, a Popeye statue unveiled during spinach festival in Crystal City, Texas.
Where lilacs grow, old-time farmers say to plant spinach when lilacs are in first leaf.
Scatter spinach or lettuce seeds around emerging bulb foliage to make wise use of your garden space, and have a leafy green crop at the ready to cover the bare spots left by deadheaded spring flowers.

spinach-feta crepes with tomato coulis here 😉
Natural Remedies: Stress and Anxiety
Natural Remedies: Stress and Anxiety

We all have times when stress, anxiety, and sleeplessness enter our lives. Here are traditional herbal remedies to help.
First calm thyself. If gardening or another relaxing activity doesn’t calm your nerves and make you sleep well, try a tea (really a tisane, from the Greek for “medicinal brew.)
Herbal Teas
- Teas of chamomile, basil, marjoram, or basil help ease stress. Use about 1 ounce fresh herbs (half of that if dried) for every 2 to 3 cups water.
- A tea of elderberry flowers is considered relaxing to the nerves and is sleep inducing, too. (Caution! Avoid if pregnant.)
- For insomnia, drink bee balm which acts as a mild sedative, calming the nerves and aiding sleep. Take an infusion of 2 teaspoons chopped leaves in 1 cup boiling water.
- Drink rosemary tea to alleviate melancholy or depression.
- Native America tea ingredients for insomnia included lady’s slipper (decocted), yarrow, mullein, hops, and purslane (decocted).
- Valerian tea (or capsules) is a natural sleep aide. In infusions, 1 ounce of the roots in 1 pint boiling water is a common recipe, consumed by wineglass as needed. (Caution: Too high a dose may lead to negative side effects!)
Food
- First, do not eat your final meal late in the evening, and keep the meal light.
- Eating lettuce with your dinner is supposed to be calming, helping you to sleep and have pleasant dreams. Some say you should not have vinegar with your lettuce.
- Mandarin oranges are soporifics, so consider adding them to your evening meal to help insomnia.
- Native Americans reportedly ate raw onions to induce sleep. (They also used a variety of herbal syrups and poultices but they’re a bit too complicated for most of us today.)
- Trying to remain relaxed but alert? Some studies suggest that the smell of apples, apple cider vinegar, or spiced apples have this effect. The right smell can make all the difference.
Massages and Rubs
- Massage the temples with lavender oil.
- A warm bath with a couple of drops of chamomile oil aides sleeping. Add a slash of lavender oil for a relaxing aroma.
- For a relaxing body rub, soak equal parts finely chopped dandelions, burdock (roots and/or aerial parts), yellow dock, and lobelia in 1 quart rubbing alcohol for two weeks. Apply externally.
Bedtime
- Strew lavender in the linen closet to scent your bed sheets with this mildly narcotic herb.
- Try putting a few drops of lavender oil in your nose—gently, with a cotton swab (Q-tip).
- Sprinkle infusions of dill on your pillowcases and quickly iron them dry or fluff them in a clothes dryer.
- Dill will also lull cranky babies to sleep. Add dill infusion to the bath, sprinkle on a baby’s blanket, or use as a hair rinse.
- Sage is considered a “ghost medicine,” used to prevent nightmares. Strew it on the floor or in the bed.
- Keep in mind: Not every fragrant herb is suitable for a good night’s sleep. Some can have the reserve effect. You may wish to consult a herbalist.
A good laugh and a long sleep are the best cures in the doctor’s book.
–Irish proverb
Related Articles
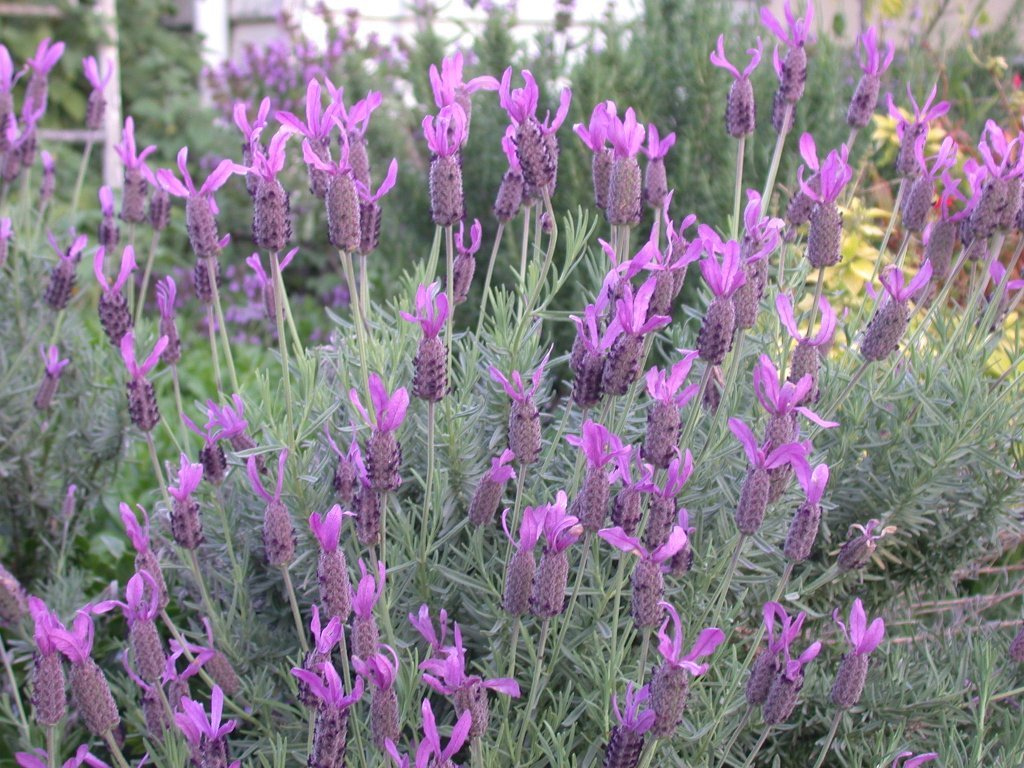


Recent Comments