

Indoor Gardens for Small Apartments | Suspended and Container Gardening

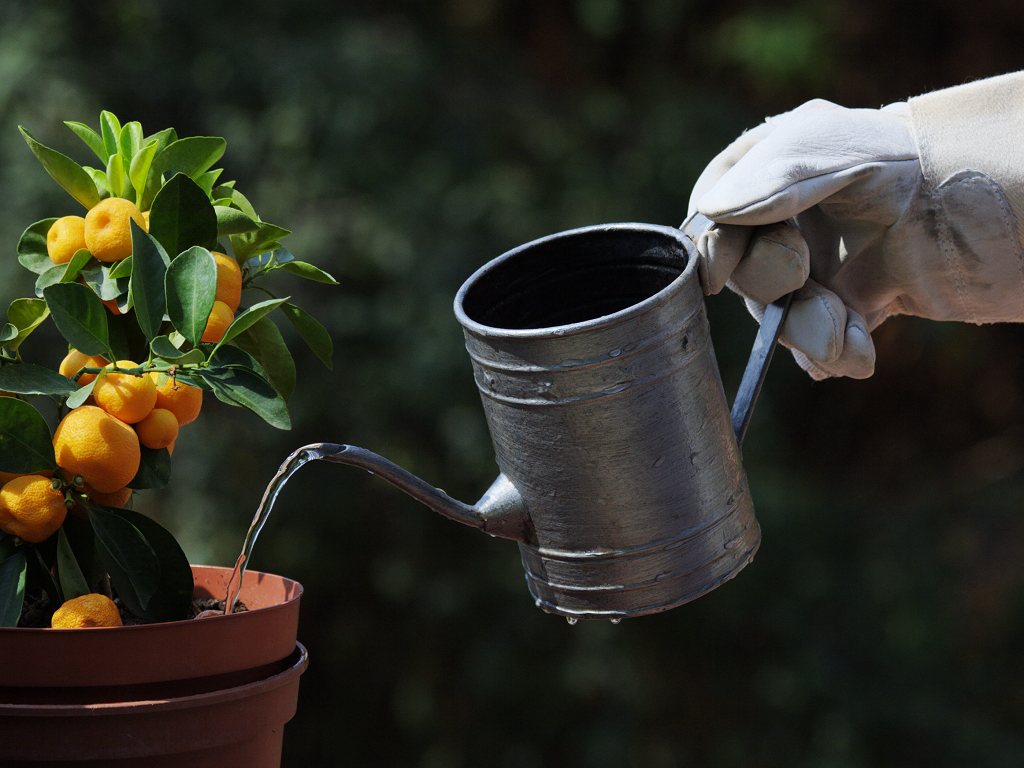
Every house should have a garden but unfortunately for many a garden is only a dream. Container gardening is a perfect solution for those who do not have much space in their home, but would like to grow their own vegetables or flowers.

Backyard Organic Container Gardening ~ Organic Gardening for Beginners

A Beginner’s Guide to Organic Gardening
Aspiring organic gardener? Then check out our comprehensive guide, filled with tips and tricks to get you started.
http://www.organicgardening.com/learn-and-grow/beginners-guide-organic-gardening


Noni Fruit Plant Care Guide ~ Morinda citrifolia

Morinda citrifolia is a tree in the coffee family, Rubiaceae. Its native range extends through Southeast Asia and Australasia, and the species is now cultivated throughout the tropics and widely naturalised.[1]
English common names include great morinda,[2] Indian mulberry, noni,[2] beach mulberry, and cheese fruit.[2]
How to Grow Noni Fruit
1. Harvest ripe noni fruits from trees that have desirable characteristics. Noni fruits become translucent when they are fully ripe. Press the fruit against a colander with holes smaller than the seeds to remove the pulps from the seeds. Rinse the seeds and place them in a glass of water. Healthy noni seeds float in water.
2. Clip the tip of the noni seeds with a small pair of sharp scissors to reduce the germination time of the seeds to between 20 and 120 days. Whole noni seeds may require up to a year to germinate.
3. Fill a seed tray with a mixture of one part peat and one part perlite. The soil pH may range from slightly acid to slightly alkaline. Sow the noni seeds in the seed tray and cover them with about 1/4 inch of soil. Place the seed tray in 20- to 30-percent shade at a temperature of 105 degrees Fahrenheit.
4. Keep the noni seedlings moist with a sprayer until they grow four leaves, then transplant them to individual pots. Place the seedlings in partial shade for one to two months before moving them into full sun.
5. Transplant the noni seedlings to their permanent location outside when they have 8 to 10 inches of woody stem, which may require six months from germination. Apply 8-8-8 fertilizer once a year according to the manufacturer’s instruction. Noni trees require about three years to bear quality fruit.
See Also ……..
The Noni Website
Noni Plant @ American Cancer Society
How Does Noni Grow?
How to Grow Noni in Containers

Carrots, Planting, Growing, Harvesting ~ Carrots in Containers

Botanical name: Daucus carota @ Old Farmer’s Almanac
Plant type: Vegetable
USDA Hardiness Zones: 4, 5, 6, 7, 8, 9, 10
Sun exposure: Full Sun
Soil type: Sandy
Soil pH: Neutral
Carrots are a popular root vegetable that are easy to grow in sandy soil. They are resistant to most pests and diseases, and are a good late season crop that can tolerate frost. Not all carrots are orange; varieties vary in color from purple to white.
Planting
- Plan to plant seeds outdoors 3 to 5 weeks before the last spring frost date.
- Make sure your soil is free of stones; carrots need deeply tilled soil that they can push through.
- Have you ever seen a carrot that has grown “legs” or forked? Fresh manure, or even recently applied rotted manure, can cause carrots to fork and send out little side roots. Don’t use it before you plant your seeds.
- Plant seeds 3-4 inches apart in rows. Rows should be at least a foot apart.
Care
- Gently mulch to retain moisture, speed germination and block the sun from the roots.
- Soil should be well drained and loose to prevent forking and stunting of the root growth.
- Once plants are an inch tall, thin so they stand 3 inches apart. Snip them with scissors instead of pulling them out to prevent damage to the roots of remaining plants.
- Water at least one inch per week.
- Weed diligently.
- Fertilize 5-6 weeks after sowing.
- Carrots taste much better after a couple of frosts. Following the first hard frost in the fall, cover carrot rows with an 18-inch layer of shredded leaves to preserve them for harvesting later.
Pests
- Wireworms
- Flea Beetles
- Aster Yellow Disease will cause shortened and discolored carrot tops and hairy roots. This disease is spread by pests as they feed from plant to plant. Keep weeds down and invest in a control plan for pests such as leafhoppers. This disease has the ability to overwinter.
Harvest/Storage
- Carrots are mature at around 2 ½ months and ½ inch in diameter. You may harvest whenever desired maturity is reached.
- You may leave mature carrots in the soil for storage if the ground will not freeze.
- To store freshly harvested carrots, twist off the tops, scrub off the dirt under cold running water, let dry and seal in airtight plastic bags, and refrigerate. If you simply put fresh carrots in the refrigerator, they’ll go limp in a few hours.
- Carrots can be stored in tubs of moist sand for winter use.
Recommended Varieties
- ‘Bolero’: resists most leaf pests.
- ‘Nantesa Superior’: sweet flavor, adapts to any soil.
- ‘Thumberline’: round carrot, good for clumpy or clay soil.
Recipes
Wit & Wisdom
Carrots are biennial plants. If you leave them in the ground, the tops will flower and produce seeds the second year.

*************
Lemon Balm ~ Melissa officinalis Plant Care Guide

Lemon balm (Melissa officinalis), also known as balm[2] or balm mint and not to be confused with bee balm (which is genus Monarda), is a perennial herb in the mint family Lamiaceae, native to center-southern Europe and the Mediterranean region.
It grows to 70–150 cm tall. The leaves have a gentle lemon scent, related to mint. During summer, small white flowers full of nectar appear. These attract bees, hence the genus name Melissa (Greek for ‘honey bee’). Its flavour comes from citronellal (24%), geranial (16%), linalyl acetate (12%) and caryophyllene (12%).
Melissa officinalis may be the “honey-leaf” (μελισσόφυλλον) mentioned by Theophrastus.[4] It was in the herbal garden of John Gerard, 1596.[5] There are many cultivars of Melissa officinalis, such as:
- M. officinalis ‘Citronella’
- M. officinalis ‘Lemonella’
- M. officinalis ‘Quedlinburger’
- M. officinalis ‘Lime’
- M. officinalis ‘Variegata’
- M. officinalis ‘Aurea’
(M. officinalis ‘Quedlinburger Niederliegende’ is an Improved variety bred for high essential oil content.)
***********

Melissa officinalis or Lemon Balm
Melissa’s sweet lemony scent and mint like leaves make it a nice plant to have in the garden. It is both a culinary and a medicinal herb. With its mild lemon flavor and scent we use it often in teas and in potpourri.
Lemon Balm is another mint family member which makes it pretty darn easy to grow. It can be grown as a perennial plant in zone 5-9. In colder regions you might want to consider it as an annual, or it can be over-wintered indoors.
You can grow Lemon Balm in containers or in the garden.
It seems perfectly happy in either place. Just remember it will need more attention in a pot- it can get thirsty in hot weather and may need frequent watering and an occasional light feeding. Don’t let it wilt TOO much or it may take awhile to recover.

Lemon Balm may become invasive
…if you live in moist climates, have a lot of rainfall and don’t trim off seed heads. That may be why many people choose to grow it in containers. I don’t have a problem with it spreading too much in my occasionally soggy, humid Midwest garden, but I usually manage to clip off seed heads before they drop all over the place.
Lemon Balm is easy to grow from seed. Press the seeds into damp soil. You don’t even have to bother covering them. Keep the seeds moist and wait. Germination may take a few weeks and you may have seedlings popping up over a period of two to three weeks.
Once your Lemon Balm is growing well, keep it trimmed back regularly for the best flavored leaves and to keep the plant looking good.

Lemon Balm Flowering
When it sports its pretty little white flowers you may find lots of bees and other pollinators flocking to it. They seem to like it as much as I do! These Lemon Balm flowers will dry and produce tiny seeds.
Want to save some seeds and grow more ‘from scratch’ ?

Lemon Balm seed Heads
This is what the flower stalks look like before the little seeds are dried and ripe….

Fresh Lemon Balm Seeds
Now you can see they are dried and brown. The seeds within are usually black and ready for harvesting at this point.
When your Lemon Balm flowers you can clip off most of the flower spikes and just save one or two for seeds. Clip off any you won’t be saving before they turn brown and start dropping seeds. That way you don’t have runaway Lemon Balm all over the garden.
To extract the seeds try rolling the dried seed head or each individual dried flower between your fingers. You will be rewarded for your work with a few tiny seeds.
You can also stick the seed heads upside down to dry in a paper bag. Many of the seeds will eventually drop in to the paper bag relieving you of all that exhausting seed head rolling ![]()
*************
See Also …
How to Grow Lemon Balm in a Pot
Lemon Balm Medicinal Qualities
Lemon Balm ~ Herbal Society of America PDF

Squash & Zucchini Planting, Growing, Harvesting Guide ~ How to Container Gardening
Botanical name: Cucurbita

Plant type: Vegetable
USDA Hardiness Zones: Varies
Sun exposure: Full Sun
Soil type: Loamy
Squash is a seasonal vegetable. It is very susceptible to frost and heat damage, but with proper care it will produce a bumper crop with very few plants.
There are many varieties of summer squash to choose from, including zucchini. The main difference between winter and summer varieties is their harvest time; the longer growing period gives winter squash a tougher, inedible skin. Here are their various botanical names: Cucurbita pepo (Summer squash/Zucchini), C. maxima (True winter), C. pepo (Acorn, delicata, spaghetti) , C. moschata (butternut).
Planting
- Start seeds indoors 2 to 4 weeks before last spring frost in peat pots.
- Do not seed or tranplant seeds outside until the soil temperature is 55 to 60º F for successful germination. Usually, you can seed any time from one week after the last spring frost to midsummer. You may be able to have two crops per season if you time it right.
- The outside planting site needs to receive full sun; the soil should be moist and well-drained, but not soggy
- Work compost or aged manure into the soil before planting for a rich soil base.
- To germinate outside, use cloche or frame protection in cold climates for the first few weeks.
- When you transplant, take care not to damage the root ball.
- Plant seeds one inch deep and 2 to 3 feet apart.
- Most summer squashes now come in bush varieties, but winter squash is a vine plant and needs more space. They will need to be thinned in early stages of development.
Care
- Mulch plants to protect shallow roots, discourage weeds, and retain moisture.
- Plants love lots of compost and will produce better if well fed. When the first blooms appear, apply a small amount of fertilizer as a side dress application and water thoroughly.
- After harvest begins, fertilize occasionally for vigorous growth and lots of fruits.
- For all type of squash, frequent and consistent watering is recommended. Water most diligently when fruits form and throughout their growth period.
- To know when to water, use the finger method. Put your finger in the soil and if it’s dry beyond the first joint, it needs watering.
- If your fruits are misshapen, they might not have received enough water or fertilization.
Pests
- If your zucchini blooms flowers but never bears actual zucchini, or it bears fruit that stops growing when it’s very small, then it’s a pollination issue. Most squashes have separate male and female flowers on the same plant. To produce fruit, pollen from male flowers must be physically transferred to the female flowers by bees. If you do not have enough bees, you can manually pollinate with a Q-tip—or, add nearby plants that attract bees!
- Cucumber Beetle (link to pest page)
- Squash Bug (link to pest page)
- Squash Vine Borer (link to pest page)
- Blossom End Rot: If the blossom ends of your squash turn black and rot, then your squash have blossom-end rot. This condition is caused by uneven soil moisture levels, often wide fluctuations between wet and dry soil. It can also be caused by calcium levels. To correct the problem, water deeply and apply a thick mulch over the soil surface to keep evaporation at a minimum. Keep the soil evenly moist like a wrung out sponge, not wet and not completely dried out.
- Stink Bug: If your squash looks distorted with dippled area, the stink bugs overwintered in your yard. You need to spray or dust with approved insecticides and hand pick in the morning. Clean up nearby weeds and garden debris at the end of the season to avoid this problem.
- Aphids (link to pest page)
Harvest/Storage
- Harvest summer squash when small and tender for best flavor. Most varieties average 60 days to maturity, and are ready as soon as a week after flowering.
- Check plants everyday for new produce.
- Cut the gourds off the vine rather than breaking them off.
- Fresh summer squash can be stored in the refrigerator for up to ten days.
- Harvest winter squash when rind is hard and deep in color, usually late September through October.
- Winter squash can be stored in a cool, dark place until needed. It will last for most of the winter. If you have a cool bedroom, stashing them under the bed works well. They like a temperature of about 50 to 65 degrees F.
- Freezing Summer squash: Wash it, cut off the ends, and slice or cube the squash. Blanch for three minutes, then immediately immerse in cold water and drain. Pack in freezer containers and freeze.
- Freezing Winter squash: Cook as you normally would, then mash. Pack in freezer containers.
- Pull up those vines and compost them after you’ve picked everything or after a frost has killed them. Then till the soil to stir up the insects a bit.
Recommended Varieties
- ‘Goldbar’ (yellow summer)
- ‘Cocozelle’ (zucchini) dark green, slender
- ‘Butterbush’ (butternut)
- ‘Cream of the Crop’ (acorn hybrid, prize winning)
Recipes
Wit & Wisdom
Squash flowers make a tasty treat when fried in a light batter.
************
How to Grow and Care for Zucchini in Containers

Photo by Mangus Manske
Intro: Zucchini plants are hybrids with cucumbers. Growing zucchini in plant containers in kitchen gardens is easy, and your plants should produce great-tasting fruit quickly. There are a few zucchini varieties, but most are a dark green color. Some zucchini varieties are light green, yellow or orange. Because zucchini plants are large, choose a very large plant container that is at least 2 feet by 2 feet for one plant. If you crowd your zucchini plants, it will negatively affect the yield.
Scientific Name: Cucurbita pepo hybrid
Plant Type: This plant is considered an annual vegetable, although the zucchini is technically a fruit.
Light: Full sun
Water: When it comes to watering your zucchini plants, provide well-draining potting soil that is constantly moist but never soggy.
Zone: The zucchini plant is a warm-weather crop.
Fertilizer: When you prepare the potting soil for planting, introduce compost or a slow-release fertilizer. Also add a slow-release fertilizer to your zucchini plants once a month for the rest of the growing season.
Pests and Diseases: Snails and slugs can be a common garden problem with zucchini plants. Powdery mildew is prevalent in crowded plants. Keep the zucchini leaves dry when watering, and cut off affected leaves.
Propagation: Sow zucchini seeds directly outside in the kitchen garden after the last frost has passed. Plant the seeds about three-fourths of an inch deep in the potting soil. You can also begin seeds indoors in March if you want to get started early. Zucchini seeds will germinate in about a week, give or take a couple of days. Thin zucchini seedlings by cutting weak seedlings (don’t pull the seedlings out) once two true leaves have formed. Fruit will not form without bees and other pollinators. Don’t use pesticides on your zucchini that will affect pollinators.
Misc. Info: Harvest your zucchini from the kitchen garden once they’re about 8 inches long and at least 1.5 inches thick. Don’t wait too long, or the zucchini fruit will dry out and not taste as good.
Zucchini blooms are also eaten, just like pumpkin flowers, and can be fried or eaten in a quesadilla. Unlike the cucumber, zucchini fruit is usually cooked. It can be cooked in many different ways. Use your zucchini within three days.

**********
See Also …
How to Grow Zucchini | Guide to Growing Zucchini
How to Grow Zucchini
Zucchini: A Growing Guide @ Organic Gardening
Solutions For Common Problems Growing Zucchini

Planting Onions

Planting Onions ~ by National Gardening Association Editors
Plant your sets early in the spring. Onions do best if the temperature is cool when they start to grow, and warm as they mature. Northern springs are certainly cool — and often frosty! But as the saying goes, “You can’t kill an onion — even with a hammer!”
Frost just won’t harm sets. As soon as the ground can be worked in the spring, put the sets in. In the North that’s usually in late March and early April. Gardeners in the mild winter areas of the Deep South can plant their sets in the fall and get a plentiful supply of fresh onions throughout the winter months.
Why Onions Form Bulbs
Onion sets you plant in early spring will put on a lot of green top growth before they make bulbs. You may ask, “Why don’t the bulbs start forming right away?” The answer is that before the plants can make bulbs, they first have to store energy in the top green leaves. Then they must wait for nature’s signal to put this energy into bulb making.
The plants usually get the message when the day length and the temperature are right. The onions don’t care how old they are or when they were put in the ground; when conditions are right, they simply stop making new leaves and start using the energy they’ve stored to make bulbs. The size of the onion bulb is determined by how much energy there is in the top green leaves before the light conditions signal to start diverting energy to the bulbs. The more green growth before this time, the more energy there is and the bigger the bulb will be.
Early planting is important because it gives your onions plenty of time to grow tops and to store a lot of energy for the bulbs. If you put your sets in late, they won’t have the time for a lot of top growth. As a result, there won’t be much energy available when nature whispers to the onion plant, “Make a bulb.”
The Wide-Row Method
Plant sets three to four inches away from each other in wide rows (or a little closer if you plan to harvest them when they’re small). Wide rows are useful for onions and many other vegetables because you can grow much more using less space. That’s especially important if you only have a small plot. Here’s why:
If you plant 100 onion sets three inches apart in a single row, your row will be 25 feet long. If you allow a few inches, say three, on each side of the set, the row will be six inches wide. That’s a total of 12 1/2 square feet of garden space for 100 sets. But with a wide row 15 inches across, putting the 100 sets three inches apart in all directions, your row will be just 5 feet long and 6 1/4 square feet. A wide row is easier to water, weed, fertilize and harvest, too.
In the Ground
There’s no need to make trenches or special holes for the sets. Just grasp them at the top (the pointed end) with the root end down and push them into well-prepared soil the full depth of the bulb. The soil should just barely cover the top of the onion sets. If you have some tiny sets, plant them at least an inch in the ground, so they get good contact with the soil. The sets will get a better start. After you’ve got your sets in the ground, firm the soil around them with a hoe.
Remember, if a set is planted too shallowly, it takes a long time to get started. It’s important to push the bulb all the way into the soil. It gets the onion off to a good start for producing a lot of top growth. If the onion sets are a little too deep, it won’t hurt. Later, when the bulbs are expanding, pull some of the dirt away from the sides to give the bulbs room to expand.
You may not want to plant all your sets at once. Try keeping back a few handfuls in the refrigerator. When you start harvesting some small onions to eat raw or use in salads and other dishes, replace them with sets from the refrigerator. Just remember that onion sets planted later in the spring won’t develop into large onions.
***************
How to Make Onion Sets ~ click here
How to Save Onion Seeds ~ click here
****************
… and some photos from my new onion patch, was just a small spot i dug last year for plants and flowers i received as donations/gifts mid season,along with some sunflowers i had planted against house. this year, after clean up, i sliced the soil and added good layer of garden compost before planting onion sets had saved from last fall … all you really have to do is start some seeds mid summer or so, the bulbs will not have much time to develop, harvest them before freeze and store in cool, dry place. i use old nylon stocking, i do same for onion storage, only i tie a knot between onions and hang somewhere for easy access. you can start indoors in spring but is easier to grow your own bulbs outside in late summer, in my humble opinion.
my rhubarb, lemon balm and irises are staying there for now in onion patch. that might just be my hardy garden spot, as it is full of tree roots also … rough spot but they seem to like it 🙂


Lemon Balm

Irises


Rhubarb update 22 April 2013


Recent Comments