
Tamarillo Tree….. Cyphomandra betacea
Tamarillo Tree….. Cyphomandra Betacea
|


The Perfect Compost Recipe – How to Get Your Compost Heap Cooking!
Compost is the very best food you can give to the plants in your garden. However, making really great compost requires the right mix of ingredients. In this video we demonstrate how to create that perfect recipe from the ingredients you have at home. You’ll see the compost mix being created, find out what materials to avoid, trace how the compost heap progresses as it ‘cooks’ and discover how to fix common problems.

You can plan where to site your compost heap using the drawing tools available in our Garden Planner which is available from several major websites and seed suppliers:
http://www.GrowVeg.com
http://gardenplanner.motherearthnews….
http://gardenplanner.almanac.com/
Growing Beans – Tips On How To Grow Beans In Pots
Growing Beans – Tips On How To Grow Beans In Pots

Image by Maggie McCain
By Bonnie L. Grant
Beans may be vined or bushy and come in several sizes and colors. They are primarily a warm season vegetable, which is best grown in spring but can also be started for a late summer harvest in some temperate zones. Gardeners with small spaces can learn how to grow beans in pots. Growing beans in containers is also useful for early starting where soil temperatures remain too cool for in-ground potting. These plants will need to be brought indoors at night to protect them from possible freezing temperatures.
Container Size for Growing Beans
The depth of the container size for growing beans varies dependent upon the type of vegetable. Pole beans need 8 to 9 inches of soil, whereas bush beans can do with only 6 to 7 inches.
Ensure that the pot has several unobstructed drainage holes when growing beans in containers. While the appearance of the pot isn’t important, using unglazed pots will help the containers to “breathe” and allow for the evaporation of excess water so the plants don’t drown.
The number of plants you can sow in a container depends on the diameter of the pot. As a rule, plan on nine plants for every 12 inches of surface space.
Use a seed variety that produces well in container gardening such as Kentucky Wonder, Blue Lake pole or Topcrop
How to Grow Beans in Pots
Whenever you are growing beans in containers, the most important components to consider in the successful care for potted bean plants are the soil type, drainage, pot depth and ambient conditions.
Fill your container with the proper potting mix for beans and other vegetables. You can purchase a vegetable start mix or make your own. Use equal parts sphagnum moss or compost with pasteurized soil and vermiculite or perlite.
Incorporate vegetable fertilizer or manure prior to planting. You can also use a soilless medium as a potting mix for beans. Plant the seeds an inch deep and provide even moisture until the seeds germinate. Space the seeds 3 inches apart or plant 2 to 3 seeds around each pole for vining varieties.
Care for Potted Bean Plants
Your bean seeds will germinate in 5 to 8 days. Once they have pushed up, spread mulch lightly over the surface of the soil to help conserve moisture. Bean plants need plenty of water, and this is especially true with the care of potted bean plants. You need to provide irrigation when the top 2 to 3 inches of soil is dry to the touch.
Fertilize once a month with a diluted liquid vegetable fertilizer unless you mixed a time-release food into the soil medium.
Provide pole beans with a long stick or pole to climb up. Alternatively, insert a tomato cage into the container for the vegetables to twine around. Bush beans need no special support.
Watch for insects and other pests and combat with vegetable-friendly products such as horticultural soap or neem oil.
Growing beans in containers should provide you with edible pods in 45 to 65 days when grown in full sun. Harvest the beans when the pods are medium sized with firm pods. Use them fresh for the best taste, or you can freeze or can them to enjoy far past the season.
How To Grow Organic Pumpkins
PUMPKIN FACTS
- If you’re growing pumpkins, you’ll be following the same guidelines as you’d follow for winter squash.
- The most ancient evidence of growing pumpkins dates back to around 7000 B.C. in Mexico.

- Farmers in the U.S. are currently growing pumpkins at around 1.5 billion pounds per year; gardeners add a lot more.
- One of the favorite usages of pumpkins is for the Halloween “holiday” when much of the populace carves goofy faces in their pumpkins and put candles in them. If you really want to know why, Google it.
WHEN TO PLANT
- You’ll need about 80 to 120 frost free days when growing pumpkins to allow them to mature.
- You can begin growing your pumpkins indoors about 4 weeks before your last frost date. The soil should be about 60° to 65°F at 2 inches depth.

- If you use floating row covers, you can transplant pumpkins to your garden a couple weeks before the last anticipated frost.
- If you live in warmer areas you can plant your pumpkin seeds directly after the danger of frost is past, typically around the end of March or mid-April.
- You’ll want to plan to have your pumpkins mature by late summer or early fall. The larger the pumpkin, the more days they take to mature.
WHERE TO PLANT
- Pumpkins require (at the very least) 6 hours of full sunlight daily.
- Growing pumpkins requires garden soil that drains well, and has plenty of organic materials blended into it.
- Your soil ideally should have a pH balance in the range of 5.8 to 7.5; right in the middle of that is the best pH level.
- Your soil needs sufficient levels of nitrogen, phosphorus, and potassium, most of which are achieved with the liberal application of compost and/or composted manure, bone meal, blood meal, and the like.
PREPARING THE SOIL
- As mentioned above, Pumpkins need generous amounts of soil nutrients, which can be supplied mainly with compost and composted-manure.
- The best way to apply your compost is to lay out where your hills will be, then mix several inches of compost into about a 2 foot diameter area – about a foot deep.

- If you’re rototilling rows, add 2 to 4 inches of compost, composted manure, etc., and rototill it to around 8 inches deep.
- You can also mound the soil where your plants will be to aid in the mixing in of compost or other organic matter.
- Other items you can add to your soil are alfalfa meal early in the season for nitrogen – and/or feather meal later in the season – ground oyster or egg shells for calcium, greensand for potassium, and kelp meal for trace nutrients.
CHOOSING THE RIGHT SEED VARIETIES FOR YOUR AREA
- If you have a small garden, be aware that pumpkin vines can occupy up to 100 square feet or more.
- Pumpkins, at least most varieties, are too heavy to trellis, but do grow well in larger garden areas.

- Contact your county extension office to find out if there are common diseases in pumpkins in your area. If there are, get recommendations for seed varieties that are resistant to those diseases.
- Diseases that afflict pumpkins are covered in detail in the latter part of this post.
SEEDS AND GERMINATION
- Pumpkin seeds are usually still plantable 6 years after you’ve purchased them from a reputable seed supplier.

- Pumpkin seeds won’t germinate in soil temperatures lower than 60°F or higher than 105°F. The optimum germination temp is between 86°F to 95°F.
- The seedlings should emerge in about 5 days at the optimum temperature range, if they are in full sunlight or under grow lights (fluorescent lights are OK).
- If you’re seeding directly to your soil, you can use a black plastic mulch to heat up your soil. Secure your plastic with soil (make sure all edges are covered with dirt), and cut holes for seeds.
STARTING PUMPKIN PLANTS INDOORS
- Plant your pumpkin seeds in peat pots or soil blocks 3 or 4 weeks before the last frost. You can use tapered plastic pots as well, but peat pots and/or soil blocks are better options.
- Use a good potting mix or starter mix to start your pumpkin seeds in. These mixes are readily available at your local garden center.

- If you want to create your own potting soil mix, you can purchase mixing loam soil, sphagnum peat moss, and perlite at your local garden store. Adding compost to this mix will create an optimal starter mix.
- Don’t use garden soil as it has lots of weed seed, fungus spores, and bugs in it that aren’t optimal for starting your pumpkins indoors.
- If you want to grow a pumpkin plant in a container, you’ll need at least a 10 gallon pot.
- Mix 9 gallons of potting mix, a couple cups of alfalfa meal, half a cup of feathermeal, half a cup of powdered eggshells or oyster shells for calcium, half a cup of greensand for potassium, and a few tablespoons of kelp to cover your trace minerals.
- Plant three or four seeds about 1″ deep. Don’t thin until the plants have at least 2 true leaves; leave the 2 best seedling and after the plants reach about 10 inches tall, choose the best plant and clip the other off with a scissor.
TRANSPLANTING PUMPKINS TO YOUR GARDEN
- Before you actually transplant your pumpkins to your garden, you’ll need to “harden off” your plants.
- To harden off your pumpkin seedlings, move them outside during the daytime and cut back on watering.
- Your plants should have 2 or more true leaves at this stage – it will have been 3 to 4 weeks since you planted them.

- As pumpkins prefer warm temperatures, ideally the daytime temps should be about 75° to 85°F and 60° to 65°F at night.
- However, if you live as far North as we do, you may not hit those temperatures until 2-4 weeks after transplanting, so it might be advisable to use row covers and black plastic ground cover to help your pumpkins to get a good start.
- You need a minimum soil temp of 60°F to plant your squash, so plant them in an area that gets lots of sun.
- If you’re planting in rows, space the rows 4 to 6 feet apart and the plants about 2 to 3 feet apart in the rows. If you have a larger variety of pumpkin, you might want to plant them 3 to 4 feet apart in the rows.
- When you plant your pumpkin seedlings, dig a hole large enough to place the peat pot, soil block, or soil mass into; then pack soil in around the plant.
- Make sure the soil is moist but not too wet; you shouldn’t be able to pack a tight dirt clump with your hand or it’s too wet.
PLANTING PUMPKIN SEEDS DIRECTLY TO YOUR GARDEN

- Once your soil temps have stabilized above 60°F, you can plant pumpkin seeds in your garden. You should make sure that you’re past the danger of frost.
- If you’re hilling your pumpkin area, make your mounds about 4 to 8 feet apart and plant 4 to 6 seeds about one inch deep and about 1 inch apart in a circle or square configuration.
- If you’re planting in rows, the rows should be 4 to 8 feet apart, and the seeds should be planted 6 to 12 inches apart.
- Once the seeds have germinated, you can thin your plants to one every 18 to 36 inches, depending on whether they’re larger or smaller pumpkin varieties
GETTING THE MOST OUT OF YOUR PUMPKINS
- Once your plants have at least 2 true leaves, thin them to 2 or 3 plants per hill, or 18 to 36 inches apart if they’re in rows.
- Pumpkins have male and female flowers. The male flower will appear first, 40 to 50 days after germination. A week later female flowers will begin to emerge.
- If you have plenty of pollinating insects such as bees, wasps, or hornets, pollination should be no problem.

- If you have too few insects, you’ll see the female flowers begin to drop. To avoid this, you can hand pollinate by using a cotton swab or a small brush to take pollen from the male flowers and dispense it to the female flowers.
- Early in the season, make sure your pumpkin plants aren’t choked out by weeds.
- Hand pull any weeds within six inches of the pumpkin plants, then surface hoe the weeds that are further away; rototill weeds more than a foot away from your squash plants.
- Once the vines have covered the ground, you’ll not need to weed much in your pumpkin patch the rest of the season.
- It’s a good practice, about half-way through the season, to side dress your pumpkin plants (about 6 inches from the base of the plant) with compost, composted manure, or alfalfa meal.
- Pruning smaller pumpkins from your plants will help the remaining pumpkins to get bigger.
- It’s also a good idea, if you have squash borers in your area, to mound dirt around the base of your plants to discourage them from laying eggs.
- Jenny’s Tip – When you’re growing pumpkins, spray them with a liquid organic leaf spray fertilizer. We highly recommend Organic Garden Miracle™. OGM™ naturally stimulates your garden plants to produce more plant sugar in the photosynthesis process. That in turn creates a more robust plant, more produce from your garden, and better and sweeter flavored squash. And they have a really good warranty!
- Jenny’s Tip #2 – If you’re growing smaller pumpkins (the size of a volleyball or smaller), you can trellis them and as the pumpkins grow, you can use pantyhose or similar to make a sling to hold them up.
MULCHING & WEEDING

- Early in the season, black plastic may be your best mulching option as it warms the soil and suppresses weeds.
- As things heat up, grass clippings or clean straw, spread around your pumpkin plants, both help to throttle pesky weeds and conserve soil moisture.
- You won’t want to apply these types of mulches until the soils reach about 75°F as mulch tends to keep your soil cooler.
- One of the biggest assets of mulching is that because pumpkins have shallow roots systems, you won’t have to disturb them much by weeding.
WATERING PUMPKINS

- When growing pumpkins, depending on your climate, they should be watered between 1 and 2 inches weekly.
- If you mulch, you can use somewhat less water, but still check your soil’s moisture level frequently during hot, dry spells.
- If you water once per week, especially if you’ve mulched, that should be adequate.
- Water enough to get about 6 to 8 inches into your soil. Light watering of pumpkins is virtually useless.
- If your soil is sandy, use a smaller amount of water, but water a couple of times per week.
- If your pumpkins are trellised, you may need to water a bit more than if the plants are rambling across the ground.
- As with most vegetables, drip irrigation or soaker hoses are the preferred watering method. However, if you only have overhead sprinklers, water early in the day so as to reduce risk of fungi and mildews.
COMPANION PLANTING AND ROTATION CONSIDERATIONS
- A good companion for growing pumpkins includes beans, which supplement your garden with nitrogen that it absorbs from the air.
- Pumpkins are a good companion to corn as they help corn roots retain moisture.

- Radishes are reputed to protect your pumpkins from squash borers by attracting them away from your pumpkins to eat radish foliage which doesn’t hurt the radish but protects your pumpkins.
- Mint is said to help control ants, aphids, flea beetles, and rodents.
- Onions ward off fruit tree borers, weevils, aphids, rust flies, moles, and some root nematodes.
- Marigolds and Nasturtiums repel bugs and beetles away from your squashes. They also attract bees which help to pollinate your squash flowers.
- Oregano is also said to benefit squash in keeping away pests as well.
- Bad Companions for winter squash are potatoes. Potatoes inhibit the growth in squash plants.
- You don’t necessarily need to rotate squash annually unless you’re having issues with verticillium wilt, fusarium rot, mosaic virus, or other fungi-related diseases.
WHEN TO HARVEST

- Like most winter squash, pumpkins are ready to harvest when the skin is hard and you can’t puncture it with your fingernail.
- We usually wait until the first “killing frost” to harvest our pumpkins. By this time the skins are usually a dark orange and the stems have hardened.
- I always use a pruning shear to cut the pumpkin stem from the vine, leaving around 3 inches of stem. This helps protect the pumpkins from rotting and provides a handle for picking them up.
- It’s a wise practice to wear some type of cloth or leather glove when handling pumpkins as the dried stems are abrasive.
- Handle your harvested pumpkins with care. Bruising or injuring the skin will affect the storability of pumpkins
STORING AND/OR PRESERVING PUMPKINS
- Pumpkins store well through the winter. We’ve often still had pumpkins into June if they’ve been harvested with care.
- A basement area, dark space in your garage, a crawl space under your home, or a root cellar are typically ideal locations for pumpkin storage.

- If a pumpkin has been bruised or cut during harvest or when moving into the storage area, use these first as they’ll rot more quickly.
- You can cut out the rot spots and bake, steam, or otherwise cook pumpkins with no negative effects to the flavor or nutrition of the remaining portions.
- You can steam and freeze pumpkin as well as canning pumpkin if you don’t have an appropriate storage location.
- Beware: it may be difficult to get the pumpkin hot enough to kill all the bacteria that is recommended if canning a puree, so it may be best to cube the squash and can it in a little sea salt and water.
- We have experimented with pumpkins and kept them in warmer areas of our home at 65° to 70°F through the winter and still had plenty of pumpkin to eat all winter.
PREVENTATIVE AND NATURAL SOLUTIONS TO COMMON PESTS

- Cucumber Beetles are a striped beetle that is about 3/16″ in length, greenish yellow, with three black stripes running down their backs.
- The spotted cucumber beetle is pretty much the same but with a dozen spots on its back.
- Regardless of what these beetles look like, they’re pretty nasty pests that eat your plants and may spread bacterial or verticillium wilt to your plants.
- To prevent these beetles from getting to your plants, you can use row covers before flowering to keep them away from your pumpkin plants.
- If the problems get too serious, you can use organic pyrethrins or organic rotenone to deal with these critters.
- Another nasty pest is the squash vine borer. They typically appear about the time the vines begin to spread out across your garden.

- Squash vine borers are an inch long or so, quite fat, and are white with a brown head.
- They are the larvae of a small moth with dark front wings and light rear wings and a red abdomen. The moths lay eggs in the late spring or early summer near the base of your pumpkin vines.
- The borers appear about a week later and drill a hole in your vine to get inside them. You’ll see a small hole and green excretions below the hole. And you’ll see the vine die rather suddenly.
- To prevent squash vine borers from decimating your crops, first, watch for the moths (and listen…they have a buzz when they fly that’s unusual for moths).
- You may use yellow-colored bowls filled with water to trap these moths; they’re attracted to the color, fly into the bowl, then drown.
- You might alternately use row covers for about 2 weeks until the moths disappear again. Make sure you cover the edges of the row covers with dirt to seal out the moths.
- If your plants begin flowering during this time, you can hand pollinate your pumpkins if necessary. Don’t use insecticides as they can also kill beneficial insects that pollinate your crops.
- If you discover the borer has created a hole before the plant wilts and dies, you can sometimes carefully cut a hole in the vine and remove the borer. Cover the vine and the hole with dirt; most of the time the vine will send roots into the soil from the cut area.
- If you find a vine that’s been killed by a borer, cut back the vine and destroy it.

- Aphids are another common pest that can be found on the underside of your pumpkin leaves. You’ll know they’re there if you see leaves turning yellow and crinkling or curling.
- Aphids suck the juice from your plant leaves and leave a sticky substance behind. The only beneficiary of this process is ants, who harvest the sticky sweet stuff.
- The best solution to aphids is to import ladybugs to your garden. They feed on aphids and are very effective in ridding your plants of these little green, gray, or brown bugs.
- Another solution is to “wash” them off with a hose and high-pressure spray nozzle, or spray them with an organic insecticidal soap.

- Squash Bugs are probably the most prevalent pest but are somewhat easier to control than borers. They suck the sap from your pumpkin plant leaves, leaving them initially speckled; then the leaves wither and die.
- Controlling squash bugs is easier if your soil has lots of nutrients and your plants are healthy.
- Get rid of anything around your garden, such as old boards or anything they can hide under during the winter.
- It also helps to rototill or turn under your garden in the fall to eliminate places these bugs like to hide.
- To get rid of the bugs, hand-picking usually works in most gardens as they’re not so large as to take more than an hour or two per week for a few weeks in the summer.
- When you pick these bugs and nymphs, have a pail of soapy water to drop them into…the soap breaks the capillary action of water so the bugs immediately sink and drown in the water.
- If you find eggs attached to the underside of leaves or stems, simply crush the eggs.
- Lay a board or two in your pumpkin patch overnight…the bugs will congregate under the boards at night. In the morning, lift the board and capture the bugs and drop them into the soapy water pail.
- Organic compounds such as rotenone and pyrethrins are also effective if you have a heavy infestation of these varmints.
ENVIRONMENTAL FACTORS

- Blossom-end rot causes your fruit to develop a black rot on the end of the squash. Hot weather/lack of water, and/or a calcium deficiency are the main cause of the rot. It can be prevented by making sure your plants have water and, if necessary, add lime to the soil before watering.
- Downy mildew is a leaf disease that’s caused by a fungus with a long Latin name. If you really want to know the name, let me know and I’ll copy and paste it in a reply.

- This mildew usually isn’t a problem unless you have a cold spell in the 45° to 55°F range for a month or longer.
- The mildew shows up initially as yellow patches on your squash plant’s leaves, then turns brown or tan with gray or white downy fuzz below it. Then it progresses to black patches and the leaves and sometimes the plants shrivel up and die.
- To prevent downy mildew, grow squash varieties that are resistant to it.
- Also, allow plenty of space between your plants so they don’t stay wet too long.
- And if the conditions appear favorable for the disease to appear (i.e. a long cool and rainy spell), spray your leaves with a compost tea. To make the tea, put compost in a bucket and fill it with water; when it settles out, fill your sprayer with the brownish water and spray your plants’ leaves with it.

- Powdery mildew is another mildew that can affect your winter squash plants, but looks entirely different. It’s whitish and powdery and grows on squash leaves and stems.
- It is also caused by wetness, but warmth and humidity cause it rather than cool weather and rain.
- If the leaves are infected, they’ll usually die. If the infection is severe, it can kill the whole plant.
- If you are able to, avoid overhead watering. If not, water early in the morning so the plants can dry out by noon or so.
- If you keep insect pests under control and spray your vines and leaves with a compost tea solution or a baking soda solution, you most likely won’t have an issue with this disease.
- Other solutions include organic sulfur sprays or a weak solution of milk and water (9:1).
- If you spot any of this mildew, destroy your vines at the end of the season and rotate your winter squash to a new area next gardening season.
- You can also purchase seed varieties that are resistant to fungi such as downy and powdery mildews.

- Another fungus with a long Latin name causes a blight called “black rot.” Black rot is found mostly in warmer and more humid climates such as the Southeastern U.S., but can also show up in winter squash and pumpkins in the cooler climates.
- Black rot is a gummy blight that attacks the stems and leaves of squash plants. It is usually brought on by too much moisture.
- It lives on dry plant material or in the soil, where it can survive for more than a year. It is necessary to rotate your squash crops to a new area if this blight hits your plants.
- To avoid black rot, irrigation should be managed to minimize free moisture on leaf surfaces, and a minimum two-year rotation cycle is a must.
- Again, overhead watering should be avoided, but if you have no choice, water early in the day.
- You can also make an organic fungicide spray using bicarbonate of soda (baking soda). In a gallon of water add a couple drops of organic olive oil, a couple drops of environmentally-friendly liquid soap, and 3 tablespoons of baking soda. Spray it on your squash leaves to effectively control all of the above fungi.

- Fusarium fruit rot is a soil-borne fungus that may affect your pumpkin crop.
- You can see this problem in slightly sunken lesions with purplish-red margins. A white fungal growth will develop often in the center of the lesions. It can spread with watering.
- Crop rotation and planting resistant varieties are the best defense against fusarium fruit rot.
- Straw mulch can help reduce fruit rot by preventing pumpkins from contacting the soil directly.
- Don’t store pumpkins showing the described symptoms as they’ll rot quickly in storage.

- Angular leaf spot is a bacterial infections that creates spots that have a water-logged appearance and are guided by the leaf veins, giving them an angular appearance.
- Warm, wet weather is a promoter of this infection, and if things dry out, the holes created by this disease may be outgrown.
- Prevention of ALS starts with clean seeds and resistant varieties. Also, don’t crowd your plants as moisture creates the condition in which this disease thrives.
- If you have only overhead watering, water in the morning. Spray your plants with the homemade fungicide mentioned above if symptoms appear.
- Just when you thought it was safe to grow pumpkins, along comes the mosaic virus.

- Mosaic is spread by aphids mostly. Your pumpkins leaves will develop irregularly, both in shape and size, and the fruit may have the same symptoms.
- Using row covers to prevent aphids from infecting your plants may be the best option. Diatomaceous Earth also works well, but only if it remains powdery (it doesn’t work if it gets wet).
- You might think by this point we’d have nothing else, absolutely nothing else that could affect your pumpkin crop, but unfortunately we still need to mention bacterial wilt.

- Bacterial wilt goes back to your cucumber beetles; if they’re around when your pumpkin seedlings emerge, they may infect your plants early.
- Bacterial wilt causes the leaves to start to wilt into an umbrella-shaped appearance, then the whole plant collapses and dies.
- As you might imagine, controlling the cucumber beetles will control bacterial wilt, so if you’re growing your pumpkins organically, row covers are the most effective prevention early in the season.
- Most fungal infections can be controlled by planting resistant varieties, rotating your crops, and using the homemade spray mentioned earlier.
- Everything else can usually be handled by controlling the bugs with row covers, diatomaceous earth, and pyrethrins if it gets serious.
Peach Tree Growing

Peaches

Peach Trees originate from China and now thrive on a commercial basis in Mediterranean areas. They require a sunny site and protection from frost when in blossom. For these reasons, they are not suitable for areas prone to hard frost.
|
PEACH TREE Latin Name Type Hardy deciduous tree Site and Soil Plant to Harvest Time How Many? |
GardenAction does not recommend growing free-standing peach trees anywhere in cooler areas such as the UK. It is prone to failure and will take several years. However, when peaches are grown as a fan-trained tree against a south-facing wall, in many cooler areas they will produce a large crop of delicious fruit.
If your area is on the cool side or you cannot find a patch of ground which gets full sun the best alternative is to grow your peach tree in a container or pot.
Home-grown peaches will be far better than those available from the shops. Commercially grown peaches are harvested before they are ripe, and for this reason never develop the full taste of tree-ripened fruit.
Where To Grow Peaches
| Correct positioning and soil type are the key to growing peaches successfully. Peaches produce blossom in early spring and this can easily be damaged by frosts. For this reason a south-facing wall (house walls are ideal) protected from wind is the only satisfactory site. A fully-grown fan peach tree will have a spread of approximately 5m (16ft) and a height of 2.5m (8ft), so the wall needs to be large enough to allow for this growth. | 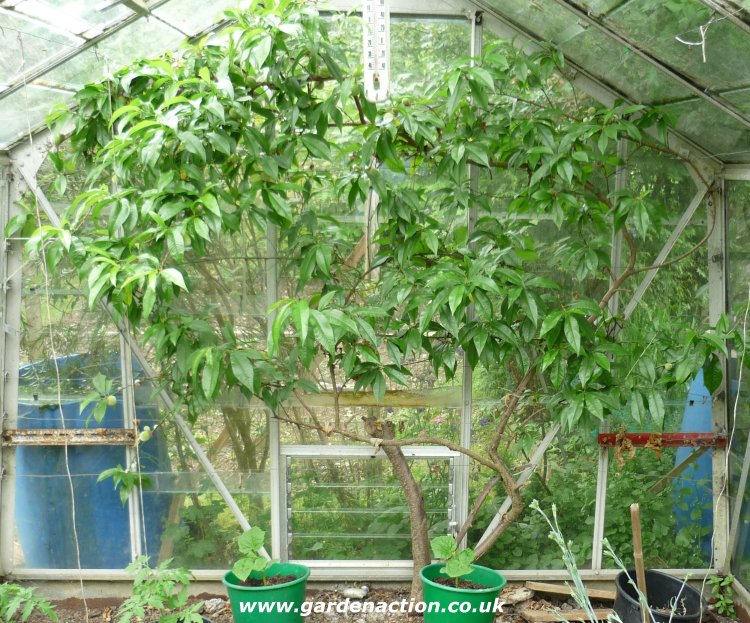 |
Also bear in mind that wire supports will need to be nailed to the wall to train the branches.
The soil should be well-dug to a depth of 75cm (2ft 6in) a couple of months before planting with plenty of compost being added.The aim is to ensure that the soil is capable of holding water, but at the same time drain well. The soil should be medium (neither too acidic nor too alkaline).
Plant Your Peach Tree ~ When and How To Plant Peach Trees
Prepare the soil well in advance of planting to allow the soil to settle well – August
is the ideal time. The planting area will be next to a wall, so dig a hole 1.8m (6ft) by 1m (3ft) to a depth of 75cm (2ft 6in). Dig the soil well, adding garden compost and/or other organic matter. Scatter two or three handfuls of bonemeal or other long-lasting fertiliser onto the soil and dig it in well.Prior to planting the tree, attach wires to the wall as indicated in the diagram. Initially, the wires should cover an area of approximately 1.5m (4ft 6in) high by 2.5m (8ft) wide. This should be sufficient for a couple of years growth. Additional wiring can be attached in later years as the tree reaches maturity – see the diagram below. When the peach tree is purchased (late September to early October is the best time) plant by spreading out the roots in the planting hole and filling in with soil to the same depth as the soil mark on the stem. The base of the stem should be 10cm (4in) out from the wall to allow for future growth. Firm the soil down. Lightly tie in any existing stems to the wire supports to allow for settlement of the soil.
Training Your Peach Tree
In March of the first year, when the new buds start to break, cut the tree back to roughly 60cm (2 ft) above ground. It is essential that at least two left and two right facing buds remain – one from each will form the principal structure of the tree. See the diagram to the right.


In the first summer, select the strongest left and right branches and remove all other shoots from the main stem. Cut back the central trunk back to 10cm (4in) above the highest branch. As the summer progresses, tie the two branches to the wires ensuring they are pointing upwards at a 45 degree angle. See the diagram to the left – note that at this stage of the year, the tree will be covered in foliage
In March of the second year, cut the two side branches back to within 45cm (18in) of the main stem.
Prune Your Peach Tree
In the second summer July, remove all growths from both of the main branches, leaving only three on each branch – two pointing upwards and one pointing downwards. See the diagram on the right.
Pruning in Later Years
The branches should first be pruned around April time after the flowers have faded and the fruit is beginning to form.

Examine the branches which are bearing fruit and remove all new shoots on them with the exception of the following:
1. Do not remove the the shoot nearest the base of the branch (see ‘DO NOT PRUNE’ in the diagram above) – this should be allowed to develop and will bear fruit next year.
2. Keep three or four of the healthiest shoots which have young developing fruit.
The second phase of pruning is in early October, when the foliage starts to die down and the structure of the tree is more visible. Cut out all branches which have produced fruit this summer as far back as the shoot nearest the base of the branch (the ‘DO NOT PRUNE’ shoot shown in the above diagram). Tie in all stems to the wire supports.

Disease and your Peach Tree
Harvesting Peaches
Individual peaches need to be exposed to the sun if they are to ripen successfully. With this in mind, lightly prune any foliage which is clearly preventing light from reaching shaded peaches.
Knowing when the fruit is ripe can be judged from it’s colour. If in doubt, gently press the fruit at the stalk end. If it ‘gives’ a little, the fruit is ripe – if it is hard, leave it for a week or so.
Ripe peaches do not keep for any length of time and they should be eaten within a day or so of harvesting.
Diseases and Pests

The most important preventable pest for peach trees is peach leaf curl. The fungus ‘Taphrina deformans’, which is responsible for the disease, over-winters in cracks in the bark. When the young leaves expand, the fungus attacks them and results in severely deformed leaves. The flowers and fruit drop. Note that when the leaves have expanded to their full size, they can no longer be infected.
The cure for peach leaf curl is to spray the entire tree towards late January with Bordeaux Mixture – this is readily available in most garden centres. Follow the instructions carefully for best effect. Repeat the spraying in mid February. In this way, the fungus will be killed before the leaves expand.
What To Do If Peach leaf Curl Strikes?
Peach leaf curl is bad for for peach trees because it causes the leaves to become infected and fall off. This puts the tree under great stress and can sometimes kill the tree. Often though the tree partially recovers and leaves begin to grow again in a month or so, not as good as before but they can grow. These new leaves will NOT become infected this season, whatever state the peach tree is in, so do not remove them because they are providing energy to a stressed tree.
The first thing to do is to remove all fruit from the tree. They will never develop fully after an attack of peach leaf curl so don’t let the tree put any energy into them. Don’t over-water but do provide water if the conditions become dry. Apply a nitrogen rich fertiliser around the base of the tree and water in well.
Then cross your fingers, wait for next year and hope!
Which Peach Tree To Buy
The best type of peach tree is a one year old tree. If bought any older, ensure that it has been pruned correctly for a fan-trained tree.
There is a limited range of peach tree varieties which are suitable for outdoor growing as a fan-trained tree. The best is ‘Peregrine’ – it produces peaches with an excellent colour and taste, crops each year and is suited for fan-training.
Do not be tempted to buy a nectarine tree! Although a type of peach tree, they are less hardy than peaches and more likely to suffer from diseases.
My own peach tree,it appears to be healthy at the time being

It’s not a long road from as healthy tree to a rotten fruit crops. Do follow the guidelines please.

affected
14 Tips for Starting Your Own Seeds

14 Tips for Starting Your Own Seeds
Ensure that your plants are organic from start to finish by starting your own seeds.
Start your own seeds and you can be sure that your plants have been raised organically from first to last. And by sprouting and nursing your own seedlings, you don’t have to wait for warm weather to get your hands dirty. Best of all, starting your own seeds is easy and fun. Here’s how to get started now:
Place sure bets
Some plants lend themselves to home germination better than others. Surefire vegetables include basil, broccoli, brussels sprouts, cabbage, cauliflower, chives, leeks, lettuce, onions, peppers, and tomatoes. Some reliable annual flowers are alyssum, cosmos, marigolds, and zinnias. Perennials include Shasta daisies, columbines, and hollyhocks.
Get the timing down
To calculate when to sow your seeds, go to our seed-starting chart, print it out and then fill in the blanks. Then you will have a planting plan you can follow through the season.
Gather containers
Reuse last year’s nursery flats if you have some around. Otherwise, any container 2 or 3 inches deep will do. Punch holes for drainage into the bottom of containers and set them into trays. Protect against plant disease by thoroughly cleaning all used containers: Wash them in hot, soapy water, and rinse with a dilute solution of household bleach and water. If you want a less-irritating substitute for the bleach, use distilled white vinegar.
Pick the right growing medium
You can buy bags of seed-starter mix or you can make your own seed-starting mix by blending equal parts of perlite, vermiculite, and peat. Add 1/4 teaspoon of lime to each gallon of mix to neutralize the acidity of the peat. You’ll eventually want to repot most of your seedlings into larger containers before setting them into the garden. But lettuce, melons, and cucumbers are finicky about being transplanted and should go directly from the original containers into the garden. When starting these fussier plants, always add two parts well-aged, screened compost to your mix to give them a healthy beginning.
Sow carefully
Moisten your medium in the containers before sowing the seeds. Next, drop seeds onto the surface of the mix, spacing them as evenly as possible. Cover the seeds to a depth about three times the thickness of the seeds. Some seeds, such as ageratum, alyssum, impatiens, petunias, and snapdragons, should not be covered at all because they need light in order to germinate.
Top it off
Lightly sprinkle milled sphagnum moss, a natural fungicide, over everything to protect against damping-off, a fungal disease that rots seeds and seedlings. In the case of seeds that need light to germinate, sprinkle the moss first and then drop the seeds onto the moss.
Keep seeds cozy
Cover the flats with plastic wrap or glass to keep the environment humid and place them near a heat vent or on a heat mat made especially for seed starting. Most seeds germinate well at about 70 degrees F.
Keep them damp
Mist with a spray bottle or set the trays into water so the mix wicks up the moisture from below.
Lighten up
At the first signs of sprouting, uncover and move the containers to a bright spot—a sunny window, a greenhouse, or beneath a couple of ordinary fluorescent shop lights (4-footers with two 40-watt bulbs). The lights are worthwhile, especially if you live in the North. They provide a steady source of high-intensity light. Short days restrict window light, and your seedlings need 12 to 16 hours of light a day. Suspend the lights just 2 inches above the plants and gradually raise them as the seedlings mature. If plants have to stretch or lean toward the light, they can become weak and spindly. To turn the lights on and off at the same time each day, hook them up to an electric timer.
Cool down
Seedlings don’t have to stay as warm as germinating seeds. Move them away from radiators and air vents, or off the heating mat, as soon they have germinated.
Feed them
If you’re using a soilless mix without compost, begin to fertilize your seedlings as soon as they get their first true leaves. (These leaves emerge after the little, round cotyledon leaves.) Water with a half-strength solution of liquid fish/seaweed fertilizer every week or two. Use either a spray bottle or add the fertilizer to the water you set the trays in if you’re using the wick-up method described above.
Give them room
If the seedlings outgrow their containers or crowd one another, repot them into larger containers filled with a mix that includes compost. Extract the seedlings with a narrow fork or flat stick, and handle by their leaves and roots to avoid damaging the fragile stems. Tuck the seedlings gently into the new pots, and water them to settle the roots.
Pet them
Lightly ruffling seedlings once or twice a day with your hand or a piece of cardboard helps them to grow stocky and strong. Or, set up a small fan to gently, continuously blow on your seedlings.
Toughen them up
About 1 week before the plants are to go outside, start acclimating them to the harsh conditions of the big world. Gardeners call this hardening off. On a warm spring day move the containers to a shaded, protected place, such as a porch, for a few hours. Each day—unless the weather is horrible—gradually increase the plants exposure to sun and breeze. At the end of the week leave them out overnight; then transplant them into the garden.
Link to the original article, above
From Austerity Blues to Green Living
 It’s surprising really, how little difference it makes to us whether the economy is booming or in recession. Sure, we’re substantially down on last year regarding income, but we’re so used to eking out every pound anyway, that economic tribulations have little or no effect on our day to day living. We grow a lot of our food, heat the house with wood that we gather, cut and chop ourselves, we’ve managed to bring our electricity bill right down and as we use a spring, we don’t pay for water. Whenever we need to buy stuff, we almost always get it second hand via Ebay or Swapshop (our local version of Freecycle) and buying new stuff has become a bit weird, tedious even. The times that I bought myself anything new to wear are so few that I remember the last three times I did so, which mostly was for special occasions and years ago. I didn’t even get anything new for my wedding, but got married in torn jeans and on bare feet and it felt good not to be a slave to the demands of a consumer culture that measures ones value according to how much money you can afford to spend buying stuff. Shopping, that popular Western pastime, makes me lose the will to live within the hour and I’m puzzled as to why so many people find the process enjoyable.
 Yet for all our frugality, we live well; our plates are full and the house is warm. It doesn’t feel like I’m wearing a hair shirt, so how do we do it? Well, it does take a bit of work and preparation. Food wise; apart from growing our own, we keep a three month pantry. It means that you can buy pasta or rice when it is on offer, get our beans and lentils in bulk via companies such as Survival Wholefoods, as well as toothpaste, laundry soap etc. Apart from the food security a three month pantry gives you and the money it saves, it also saves time (you don’t need to go shopping so often). If you join up with friends and neighbours, you can buy as a group and avoid paying delivery charges by making really big orders.
We never buy anything or pay anybody to do jobs that we can do or make ourselves and after many years, I can turn my hand to a lot of different things. We don’t go on holiday in the way most people seem to do, but we do go to festivals, where the rental of our big Berber tent is our ticket in plus expenses paid. And on those rare occasions that the weather allows, we’ve got a beach only 10 minutes away. Car and fuel remain our biggest expense, as public transport is a bit rubbish around here, but we always try and make any journey serve more than one purpose.
 This time of year, as I’m looking through gardening suppliers catalogues, I’m always astonished at how expensive gardening can become, if you go for all the gadgets and miracle cures. But it doesn’t need to be that way. Apart from a good spade, a garden fork, a simple hoe, a sharpening stone, a sharp pocket knife, a pair of secateurs and some smaller hand tools, you really don’t need a lot. Old food trays, the type that meat and mushrooms come in, make excellent seed trays, yoghurt pots, tetra bricks and plastic milk bottles cut in half make plant pots and margarine pots cut into strips make fine plant labels. Wooden vegetable boxes and blue plastic mushroom trays which you find by the dozen after a street market, make good transplant trays if you line them with newspaper. Compost bins can be made with old pallets and go to your local seed swap event to get your seeds. Even better; save your seeds from your own plants, it’s not hard to do and if you get it right, your plants should end up being better adapted to your specific growing site and conditions, year after year. “Back garden seed saving” by Sue Stickland is a good how-to book on the topic and the Real Seed Catalogue give excellent advice for free.
If you can, collect horse manure from stables nearby and get your compost in bulk from a community composting scheme, which is much cheaper than buying bags. Diluted with sand and leaf mould, it will make good seed compost. But most of all, get together with other people in your neighbourhood and share tools, seeds, plants and above all enthusiasm and you’ll find that gardening is the best cure for austerity blues!
Dandelion coffee recipe.
 I like herb teas, don’t get me wrong, but sometimes I really long for something that has a bit more oomph to it and then dandelion coffee is hard to beat in the non caffeine section. Unfortunately it is rather expensive, sold in little jars in the wholefood shop, but actually surprisingly easy to make. Dandelions grow everywhere, but try and find some that grow in a relatively pollution free area. Select the biggest, oldest plants you can find and loosen the soil around them with a fork before you harvest them.
Then scrub and cut the roots into small, even pieces roughly the size of peas. Put on a flat tray in a medium oven taking them out and stirring a few times until they are a dark brown all over. Once cooled, stick them in a coffee grinder or the grinding attachment of your blender. Grind about as fine as ordinary coffee.
Put a tablespoon per cup in a pan with water and bring to the boil. When it boils, take it of the heat and let it sit for a few minutes. Strain the coffee through a fine tea strainer into mugs. You can add sugar and milk if you like, but it has a sweetish flavour of its own and although I like a dash of milk in my dandelion coffee, I don’t need to sweeten it. Tip the grounds from the strainer back into the pan and add more hot water. It still makes a pretty decent cuppa the second time round. Apart from being a nice drink, unlike “real” coffee, this one’s actually good for your health! Cheers to austerity!


Recent Comments