
Forcing Bulbs In Winter – How To Force A Bulb Inside Your Home
Planting bulbs in winter is a wonderful way to bring a little spring into the house a little early. Forcing bulbs indoors is easy to do, whether you are forcing bulbs in water or in soil. Keep reading to learn about how to force a bulb inside your home.
Read more at Gardening Know How: Forcing Bulbs In Winter – How To Force A Bulb Inside Your Home
https://www.gardeningknowhow.com/ornamental/bulbs/bgen/forcing-bulbs.htm
If you think that autumn is the time to stop gardening think again! Bulb-planting time!
Fall-planted bulbs produce the first blooms of next year’s season. The bulbs spend the winter making roots and come up early in the spring.

Magnus Manske – Own work
Taken in the Cambridge University Botanic Garden
Tips for Planting Bulbs
- In the fall, you’ll find bulbs to purchase everywhere! Make sure you buy your bulbs from a reputable nursery, garden center, or catalog. Second-rate bulbs product second-rate flowers or don’t sprout at all.
- Plant anytime before the ground freezes. In the lower South, where you may not have hard freeze, early November is a good time to plant.
- See the chart below for type of bulbs by hardiness zone. In the warmer South, note that some bulbs need to be treated as annuals instead of perennials (e.g., tulips); they’ll bloom once and then they’re done. Still, they are a beautiful sight to behold and worth it! Other bulbs (e.g., daffodils) will act as perennials and come up year after year.
- For inspiration, visit our Flower Guides which include many common bulbs.
- Ideally, plant your bulbs soon after you purchase them.
- Select a site with lots of sun and well-drained soil. Work a few inches of compost in the soil.
- Plant bulbs generously in case some do not sprout. And plant them in random order and spacing for a more natural appearance. If you love groves of daffodils and blanketed landscapes of tulips, be prepared to buy and plant a large quantity of bulbs!
- In general, plant bulbs at a depth of three times the width of the bulb.
- After planting, apply fertilizer low in nitrogen, such as a 9-6-6 formulation. If your soil’s sandy, plant bulbs slightly deeper; in clay soils, slightly shallower.
- Water well after planting. Apply mulch to keep the weeds down and hold in moisture.
- Do you have voles or chipmunks? Consider planting your bulbs in a “cage” fashioned with chicken wire.


Flower Bulbs : How to Thin Iris Bulbs ~ Iris Plant Care Guide
CC BY-SA 3.0
File:Iris germanica (Purple bearded Iris), Wakehurst Place, UK – Diliff.jpg
Uploaded by Diliff
Created: May 16, 2014
How to Divide Bearded Irises
Bearded irises tend to become crowded every two to three years and cease to produce good blooms. Division and transplanting allows the clump to rejuvenate and also provides a way to multiply your iris. It isn’t difficult to do, but it is important to do it at the right time of year to ensure that the iris benefits most from the division.

The best time to plant or transplant iris is after flowering through August. Iris are one of the few perennials to transplant during the hottest part of the year. Established plantings of iris should be divided every 3-4 years or whenever the clump becomes crowded or when flowering decreases.

How to Plant and Grow Bearded Iris (contributions by Jim Morris)
Bearded irises are relatively easy garden plants to grow and will give good results with a minimum of care, but like all plants, the better the culture the more magnificent the display. The following instructions are easy to implement and should lead to beautiful iris blooms year after year.
Iris Variety and Plant Care Guide Here @ Auntie’s
Crocus vernus flower time lapse ~ Crocus Plant Care Guide

Crocus ~ Plant Care Guide

A sure sign of spring, crocuses have low-growing, colorful, cup-shaped flowers that are a welcome sight in garden beds and lawns.
About This Plant
Mass plantings of colorful crocuses herald the start of spring, sometimes poking their flowers right up through the snow. Because the plants flower so early, crocuses adapt well to planting in lawns and will multiply over time to cover large areas. Select varieties that mature at different times to extend the bloom season. Flower colors include blue, violet, striped, yellow, and white, and height ranges from 3 to 6 inches. While most crocus flower in spring, the saffron crocus is a fall-flowering crocus that is planted in spring.
Read in Full Here @ Auntie Dogma’s


Daylily Plant Care Guide ~ Hemerocallis

Daylily is the general nonscientific name of a species, hybrid or cultivar of the genus Hemerocallis /ˌhɛmɨroʊˈkælɪs/.[1] Daylily cultivar flowers are highly diverse in colour and form, as a result of hybridization efforts of gardening enthusiasts and professional horticulturalists. Thousands of registered cultivars are appreciated and studied by local and international Hemerocallis societies.[2] Hemerocallis is now placed in family Xanthorrhoeaceae, subfamily Hemerocallidoideae, and formerly was part of Liliaceae (which includes true lilies).
Daylilies are perennial plants. The name Hemerocallis comes from the Greek words ἡμέρα (hēmera) “day” and καλός (kalos) “beautiful”. This name alludes to the flowers which typically last no more than 24 hours. The flowers of most species open in early morning and wither during the following night, possibly replaced by another one on the same scape (flower stalk) the next day. Some species are night-blooming. Daylilies are not commonly used as cut flowers for formal flower arranging, yet they make good cut flowers otherwise as new flowers continue to open on cut stems over several days.
Hemerocallis is native to Eurasia, including China, Korea, and Japan, and this genus is popular worldwide because of the showy flowers and hardiness of many kinds. There are over 60,000 registered cultivars. Hundreds of cultivars have fragrant flowers, and more scented cultivars are appearing more frequently in northern hybridization programs. Some cultivars rebloom later in the season, particularly if their capsules, in which seeds are developing, are removed.
Most kinds of Daylilies occur as clumps, each of which has leaves, a crown, flowers, and roots. The long, linear lanceolate leaves are grouped into opposite fans with arching leaves. The crown is the small white portion between the leaves and the roots. Along the scape of some kinds of daylilies, small leafy “proliferations” form at nodes or in bracts. A proliferation forms roots when planted and is often an exact clone of its parent plant. Many kinds of daylilies have thickened roots in which they store food and water.
A normal, single daylily flower has three petals and three sepals, collectively called tepals, each with a midrib in the same or in a contrasting color. The centermost part of the flower, called the throat, usually has a different color than more distal areas of its tepals. Each flower usually has six stamens, each with a two-lobed anther. After successful pollination, a flower forms a capsule (often erroneously called a pod).
***********************
![]()
See Also …
Daylily Growing Information
Daylily Plant Care Guide
![]()
Gladiolus Plant Care Guide ~ Varieties

Gladiolus (from Latin, the diminutive of gladius, a sword) is a genus of perennial bulbous flowering plants in the iris family (Iridaceae).[1] It is sometimes called the ‘Sword lily’, but usually by its generic name (plural gladioli, gladioluses, glads).[2]
The genus is distributed in Mediterranean Europe, Asia, Tropical Africa and South Africa. The center of diversity of the genus is located in the Cape Floristic Region, where most species were discovered.[3] The genera Oenostachys, Homoglossum, Anomalesia and Acidanthera, traditionally considered independent entities, currently are included in Gladiolus.[4]
Species
The genus Gladiolus has been divided into many sections. Where possible, the sections have been indicated. Most species, however, are only tentatively placed.
- Gladiolus abbreviatus Andrews
- Gladiolus acuminatus F.Bol.
- Gladiolus aequinoctialis Herb.
- Gladiolus alatus L. (sect. Hebea)
- Gladiolus aleppicus Boiss. var. aleppicus
- Gladiolus anatolicus
- Gladiolus andringitrae Goldblatt
- Gladiolus angustus L. (sect. Blandus) : Long-tubed Painted Lady
- Gladiolus antandroyi Goldblatt
- Gladiolus antholyzoides Baker
- Gladiolus appendiculatus G.Lewis
- Gladiolus aquamontanus Goldblatt & Vlok
- Gladiolus arcuatus Klatt
- Gladiolus atropurpureus Baker
- Gladiolus atroviolaceus Boiss.
- Gladiolus aurantiacus Klatt
- Gladiolus aureus Baker : Golden Gladiolus
- Gladiolus bellus C. H. Wright
- Gladiolus benguellensis Baker (sect. Ophiolyza)
- Gladiolus bilineatus G. J. Lewis
- Gladiolus boehmii Vaupel (1882)
- Gladiolus bojeri (Baker) Goldblatt
- Gladiolus brachylimbus Baker (1893)
- Gladiolus brachyphyllus F. Bolus or Bolus f.
- Gladiolus brevifolius Jacq. (sect. Linearifolius)
- Gladiolus brevitubus G. Lewis
- Gladiolus buckerveldii (L. Bolus) Goldblatt
- Gladiolus bullatus Thunb. ex G. Lewis : Caledon Bluebell
- Gladiolus caeruleus Goldblatt & J.C. Manning
- Gladiolus calcaratus G. Lewis
- Gladiolus calcicola Goldblatt
- Gladiolus canaliculatus Goldblatt
- Gladiolus candidus (Rendle) Goldblatt
- Gladiolus cardinalis Curtis (sect. Blandus)
- Gladiolus carinatus Aiton
- Gladiolus carmineus C. H. Wright (sect. Blandus) : Cliff Lily
- Gladiolus carneus (sect. Blandus) : Large Painted Lady
- Gladiolus caryophyllaceus (Burm. f.) Poiret
- Gladiolus cataractarum Oberm.
- Gladiolus caucasicus Herb.
- Gladiolus ceresianus L. Bolus
- Gladiolus citrinus Klatt
- Gladiolus x colvillei : Colville’s Gladiolus
- Gladiolus communis L. (sect. Gladiolus) : Cornflag (type species)
- Gladiolus communis subsp. byzantinus (sect. Gladiolus) – Whistling Jack, Eastern Gladiolus
- Gladiolus communis subsp. communis (sect. Gladiolus)
- Gladiolus conrathii Baker (1898)
- Gladiolus crassifolius Baker
- Gladiolus crispulatus L. Bolus
- Gladiolus cruentus T. Moore (sect. Ophiolyza)
- Gladiolus curtifolius Marais
- Gladiolus cuspidatus
- Gladiolus cylindraceus G. Lewis
- Gladiolus cymbarius Baker
- Gladiolus dalenii Van Geel (sect. Ophiolyza)
- Gladiolus debilis Ker Gawler (sect. Homoglossum) : Small Painted Lady
- Gladiolus decaryi Goldblatt
- Gladiolus decipiens Vaupel
- Gladiolus decoratus Baker
- Gladiolus delpierrei Goldblatt
- Gladiolus densiflorus Baker
- Gladiolus deserticolus Goldblatt
- Gladiolus dolomiticus Oberm.
- Gladiolus dracocephalus Hook.f.
- Gladiolus dregei Klatt
- Gladiolus dubius
- Gladiolus dzavakheticus
- Gladiolus ecklonii Lehm.
- Gladiolus edulis Burchell ex Ker Gawler
- Gladiolus elliotii Baker (sect. Ophiolyza)
- Gladiolus emiliae L. Bolus
- Gladiolus engysiphon G. Lewis
- Gladiolus equitans Thunb. (sect. Hebea)
- Gladiolus erectiflorus Baker
- Gladiolus exiguus G. Lewis
- Gladiolus flanaganii Baker : : Suicide Gladiolus
- Gladiolus floribundus Jacq.
- Gladiolus fourcadei (L.Bolus) Goldblatt & M.P.de Vos
- Gladiolus ×gandavensis (sect. Ophiolyza) [= G. dalenii × ‘G. oppositiflorus]
- Gladiolus garnierii Klatt
- Gladiolus geardii L. Bolus
- Gladiolus goetzii Harms
- Gladiolus gracilis Jacq. (sect. Homoglossum) : Reed Bells
- Gladiolus gracillimus Baker
- Gladiolus grandiflorus (sect. Blandus)
- Gladiolus gregarius Welw. ex Baker (sect. Densiflorus)
- Gladiolus griseus Goldblatt & J.C. Manning
- Gladiolus gueinzii Kunze
- Gladiolus guthriei F. Bol. (sect. Linearifolius)
- Gladiolus halophilus Boiss. & Heldr.
- Gladiolus harmsianus Vaupel
- Gladiolus heterolobus Vaupel
- Gladiolus hirsutus Jacq. (sect. Linearifolius) : Small Pink Afrikaner
- Gladiolus hollandii L. Bolus
- Gladiolus horombensis Goldblatt
- Gladiolus huillensis (Welw. ex Baker) Goldblatt
- Gladiolus hyalinus Jacq.
- Gladiolus illyricus W.D.J.Koch – Wild Gladiolus
- Gladiolus imbricatus L.
- Gladiolus inandensis Baker
- Gladiolus incospicuus Baker
- Gladiolus inflatus Thunb.
- Gladiolus inflexus Goldblatt & J.C. Manning
- Gladiolus insolens Goldblatt & J.C. Manning
- Gladiolus intonsus Goldblatt
- Gladiolus invenustus G. J. Lewis
- Gladiolus involutus (sect. Hebea)
- Gladiolus iroensis (A. Chev.) Marais
- Gladiolus italicus P. Mill. (sect. Gladiolus) – Italian Gladiolus, Cornflag
- Gladiolus johnstoni Baker (s. d.)
- Gladiolus jonquilliodorus Ecklon ex G. Lewis
- Gladiolus junodi Baker
- Gladiolus kamiesbergensis G. Lewis
- Gladiolus karendensis Baker
- Gladiolus katubensis De Wild.
- Gladiolus klattianus Hutch.
- Gladiolus kotschyanus Boiss.
- Gladiolus kubangensis Harms
- Gladiolus lapeirousioides Goldblatt
- Gladiolus laxiflorus Baker
- Gladiolus lemoinei
- Gladiolus leptosiphon Bolus f.
- Gladiolus liliaceus Houtt. (sect. Homoglossum)
- Gladiolus linearifolius Vaupel
- Gladiolus linearis N.E.Br.
- Gladiolus longanus Harms
- Gladiolus longicollis Baker (sect. Homoglossum)
- Gladiolus longicollis subsp. longicollis (sect. Homoglossum)
- Gladiolus longicollis subsp. platypetalus (sect. Homoglossum)
- Gladiolus loteniensis Hilliard & Burtt
- Gladiolus louiseae L. Bolus
- Gladiolus lundaensis Goldblatt
- Gladiolus luteus Lam.
- Gladiolus lyalinus
- Gladiolus macneilii Oberm.
- Gladiolus macowani Baker
- Gladiolus macowanii Baker (s. d.)
- Gladiolus macrospathus Goldblatt
- Gladiolus maculatus Sweet
- Gladiolus magnificus (Harms) Goldblatt
- Gladiolus malangensis Baker (1879)
- Gladiolus malvinus Goldblatt & J.C. Manning
- Gladiolus marlothii G. Lewis
- Gladiolus martleyi L. Bolus (sect. Homoglossum)
- Gladiolus meliusculus (G. Lewis) Goldblatt & J.C. Manning
- Gladiolus melleri Baker (sect. Ophiolyza)
- Gladiolus micranthus Baker (1901)
- Gladiolus microcarpus G. Lewis
- Gladiolus microsiphon Baker
- Gladiolus milleri Ker Gawler
- Gladiolus mirus Vaupel
- Gladiolus monticola G. Lewis ex Goldblatt & J.C. Manning
- Gladiolus mortonius (sect. Densiflorus)
- Gladiolus mostertiae L. Bolus
- Gladiolus muenzneri F. Vaup
- Gladiolus murielae Kelway (syn. G. callianthus) – Abyssinian Gladiolus
- Gladiolus natalensis (Eckl.) Hook.
- Gladiolus nerineoides G. Lewis
- Gladiolus newii Baker
- Gladiolus nigromontanus Goldblatt
- Gladiolus niveus Goldblatt & J.C. Manning
- Gladiolus nyasicus Goldblatt
- Gladiolus oatesii Rolfe
- Gladiolus ochroleucus Baker (sect. Densiflorus)
- Gladiolus odoratus L. Bolus
- Gladiolus oliganthus Baker
- Gladiolus oppositiflorus Herbert (sect. Ophiolyza)
- Gladiolus orchidiflorus Andrews (sect. Hebea)
- Gladiolus oreocharis Schltr.
- Gladiolus pallidus Baker
- Gladiolus paludosus Baker
- Gladiolus palustris : Marsh Gladiolus
- Gladiolus papilio Hook. f. (sect. Densiflorus) : Goldblotch Gladiolus
- Gladiolus pappei Baker (sect. Blandus)
- Gladiolus pardalinus Goldblatt & J.C. Manning
- Gladiolus parvulus Schltr.
- Gladiolus patersoniae F. Bolus or Bolus f.
- Gladiolus pavonia Goldblatt & J.C. Manning
- Gladiolus permeabilis Delaroche (sect. Hebea)
- Gladiolus perrieri Goldblatt
- Gladiolus persicus Boiss.
- Gladiolus pillansii G. Lewis
- Gladiolus pole-evansii Verd.
- Gladiolus praecostatus
- Gladiolus praelongitubus G. J. Lewis
- Gladiolus pretoriensis Kuntze
- Gladiolus priorii (N. E. Br.) Goldblatt & De Vos
- Gladiolus prismatosiphon Schltr.
- Gladiolus pritzelii Diels
- Gladiolus psittacinus Hook.
- Gladiolus puberulus Vaupel
- Gladiolus pubigerus G. Lewis
- Gladiolus pulchellus Klatt
- Gladiolus pulcherrimus (G. Lewis) Goldblatt & J.C. Manning
- Gladiolus punctulatus Schrank
- Gladiolus pusillus Goldblatt
- Gladiolus quadrangularis (Burm. f.) Ker Gawler
- Gladiolus quadrangulus (Delaroche) Barnard
- Gladiolus ramosus
- Gladiolus recurvus (sect. Homoglossum)
- Gladiolus rehmannii Baker
- Gladiolus remotifolius Baker
- Gladiolus rigidifolius Baker
- Gladiolus robertsoniae F. Bolus or Bolus f.
- Gladiolus rogersii Baker
- Gladiolus roseovenosus Goldblatt & J.C. Manning
- Gladiolus rubellus Goldblatt
- Gladiolus rudis Lichtst. ex Roem. & Schult.
- Gladiolus rupicola F. Vaupel
- Gladiolus saccatus (Klatt) Goldblatt & M.P. de Vos
- Gladiolus salteri G. Lewis
- Gladiolus saundersii Hook. f. : Saunders’ Gladiolus, Lesotho Lily
- Gladiolus schlechteri Baker
- Gladiolus schweinfurthii Baker
- Gladiolus scullyi Baker
- Gladiolus serapiiflorus Goldblatt
- Gladiolus serenjensis Goldblatt
- Gladiolus sericeovillosus Hook. f.
- Gladiolus serpenticola Goldblatt & J.C. Manning
- Gladiolus somalensis Goldblatt & Thulin
- Gladiolus speciosus Thunb.
- Gladiolus spectabilis Baker (s. d.)
- Gladiolus splendens ((Sweet)) Herbert
- Gladiolus stefaniae Oberm.
- Gladiolus stellatus G. Lewis
- Gladiolus subcaeruleus G. Lewis
- Gladiolus sufflavus (G. Lewis) Goldblatt & J.C. Manning
- Gladiolus sulcatus Goldblatt
- Gladiolus taubertianus Schltr.
- Gladiolus tenellus Ecklon
- Gladiolus tenuis M. Bieb.
- Gladiolus teretifolius Goldblatt & De Vos
- Gladiolus thomsonii Baker
- Gladiolus trichonemifolius (sect. Homoglossum)
- Gladiolus tristis (sect. Homoglossum)
- Gladiolus tristis var. concolor (Salisb.) Baker : Ever-flowering Gladiolus
- Gladiolus tritoniaeformis
- Gladiolus tritoniiformis Kuntze
- Gladiolus uitenhagensis Goldblatt & Vlok
- Gladiolus undulatus L. (sect. Blandus) : Waved-flowered Gladiolus
- Gladiolus unguiculatus Baker
- Gladiolus usambarensis Marais ex Goldblatt
- Gladiolus uysiae L. Bolus ex G. Lewis
- Gladiolus vaginatus F. Bolus or Bolus f. (sect. Homoglossum)
- Gladiolus validissimus Vaupel
- Gladiolus vandermerwei (L. Bolus) Goldblatt & De Vos
- Gladiolus varius F. Bolus or Bolus f.
- Gladiolus velutinus De Wild.
- Gladiolus venustus G. Lewis (sect. Hebea)
- Gladiolus vernus Oberm.
- Gladiolus vinoso-maculatus Kies
- Gladiolus violaceo-lineatus G. Lewis
- Gladiolus virescens Thunb. (sect. Hebea)
- Gladiolus viridiflorus G. Lewis
- Gladiolus viridis Aiton
- Gladiolus watermeyeri (sect. Hebea)
- Gladiolus watsonioides Baker : Mackinder’s gladiolus
- Gladiolus watsonius Thunb. (sect. Homoglossum)
- Gladiolus woodii Baker
- Gladiolus zimbabweensis Goldblatt
************************

Botanical name: Gladiolus @ Old Farmer’s Almanac
Plant type: Flower
USDA Hardiness Zones: 6, 7, 8, 9, 10
Sun exposure: Full Sun
Soil type: Any
Flower color: Red, Pink, Orange, Yellow, White, Multicolor
Bloom time: Summer
Gladiolus is a perennial favored for its beautiful, showy flowers. Its flowers grow on tall spikes and are often found in cutting gardens or in the back along the border (because they are tall). Gladioli have many different colored flowers, and grow between 2 to 6 feet in height. It’s good for cut flowers.
Planting
- Plant gladiolus bulbs in the spring once danger of frost has passed and the soil has warmed.
- Ready your garden by using a garden fork or tiller and loosen the soil to about 12 to 15 inches deep. After loosening the soil, mix in a 2– to 4–inch layer of compost.
- Plant your bulbs 4 to 8 inches deep with the pointed end facing up. Space the corms 3 to 6 inches apart. Water the corms thoroughly.
- Gladioli like well-drained, light soil and full sun.
- If you’re planting tall varieties, be sure to stake them at planting time. Be careful not to damage the corms with the stakes.
- It takes about 90 days from the time gladioli are planted to root, grow, bloom, and store enough energy for the next season.
Care
- Put a 2– to 4–inch layer of mulch around your gladioli to keep your soil moist and help prevent weeds.
- If you get less than 1 inch of rain a week, water your plants regularly throughout the summer. Otherwise, water them moderately when in growth to keep the soil moist.
- Remove the faded/dead flowers to ensure continuous growth. Once all the flowers on a stalk have gone, cut off the stalk.
- Be sure to leave the plant intact so it can mature and rejuvenate the corms for the next season.
- If you live in zones 7 or 8, put down a layer of hay or straw for winter protection.
- Corms should be dug before the last frost in you live in zone 7 or ones colder.
Pests
Harvest/Storage
- At the end of the season, cut the stalks to within an inch of the corms, then leave them in a warm, airy location for 1 to 2 weeks.
- Remove and throw away the oldest bottom corms and store the new corms in plastic, mesh bags in a well–ventilated room. The temperature of the room should be between 35º and 45ºF. Replant these corms in the spring.
Recommended Varieties
- Candyman, for its beautiful deep pink flowers
- Dream’s End, which makes a good back border plant because its flower spike is up to 3 feet long (and it has pretty light orange flowers with large yellow centers)
- Prins Claus, which has white flowers with splashes of pink on its petals
******************
See Also …
Gladiolus Planting Guide
Gladiolus @ National Gardening Association
GROWING GLADIOLUS


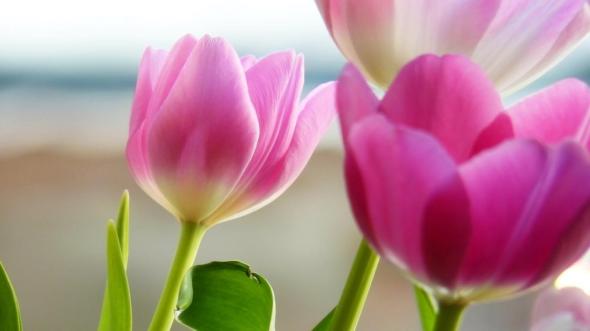
Tulip Plant Care Guide

The jewels of the spring bulb garden, tulips are available in a huge range of flower shapes, sizes, and colors.
About This Plant
From stately formal plantings to naturalized woodland areas, there’s a type of tulip for every garden setting. Tulips grow best in areas with cold winters, cool springs, and cool summers. The smaller species tulips are reliably perennial, while larger types may need to be replanted every few years. Flower colors include apricot, pink, salmon, red, deep maroon, and white, and flowers may be double, ruffled, fringed, or lily-shaped, depending on the variety. Height ranges from 6 inches to 2 feet. By planting varieties with different bloom times, you can have tulips blooming from early to late spring. Some types are good for forcing into bloom indoors.
Special Features
Good for cut flowers
Site Selection
Select a site with full sun to light shade and well-drained soil. Tall varieties should be sheltered from strong winds.
Planting Instructions
Plant tulip bulbs in fall, six to eight weeks before a hard frost is expected and when soils are below 60 degrees F. This is usually during September and October in the north, and October and November in the south. Prepare the garden bed by using a garden fork or tiller to loosen the soil to a depth of 12 to 15 inches, then mix in a 2- to 4-inch layer of compost. Dig a hole about three times as deep as the height of the bulb. Set the bulb in the hole, pointy end up, then cover with soil and press firmly. Space bulbs 4 to 6 inches apart. Water thoroughly after planting. If hungry voles or mice are a problem, plant bulbs in buried wire cages to protect them from getting eaten.
Care
Keep tulips watered during dry spells in the fall. After plants are finished flowering in spring, cut back flower stalks but allow the leaves to die back naturally, hiding the unsightly foliage with annual or perennial plantings. An annual application of compost should provide adequate nutrients. Large varieties may need replanting every few years; small types usually multiply and spread on their own.


Recent Comments